27 Essential Adobe Premiere Pro Tips for Beginners
Last UpdatedSeptember 30, 2023
by
Anthony Gallo

If you're new to Adobe Premiere Pro you might be intimidated by the massive amount of buttons, options, and features available.
While you can get away with making some pretty good edits without using a lot of these inbuilt features, getting to know Premiere Pro a little bit better will do nothing but save you time and improve your edits!
In this article, we'll learn 27 essential Adobe Premiere Pro tips and tricks for anyone looking to simultaneously level up their production value and efficiency.
27 Adobe Premiere Pro Tips for Beginners
You might be familiar with some of these or none of them!
It's a great idea to add this page to your favorites bar. Come back and try to learn a new trick every week. Before long you'll be a master editor in Premiere Pro. Let's get into 27 of the best tips for Premiere Pro.
1. Playback Resolution
One of the first Adobe Premiere Pro tips for beginners is to adjust the playback resolution.
When working with high-resolution footage like 4K or RAW video, playback performance can slow down as Premiere strains to process so many pixels in real-time.
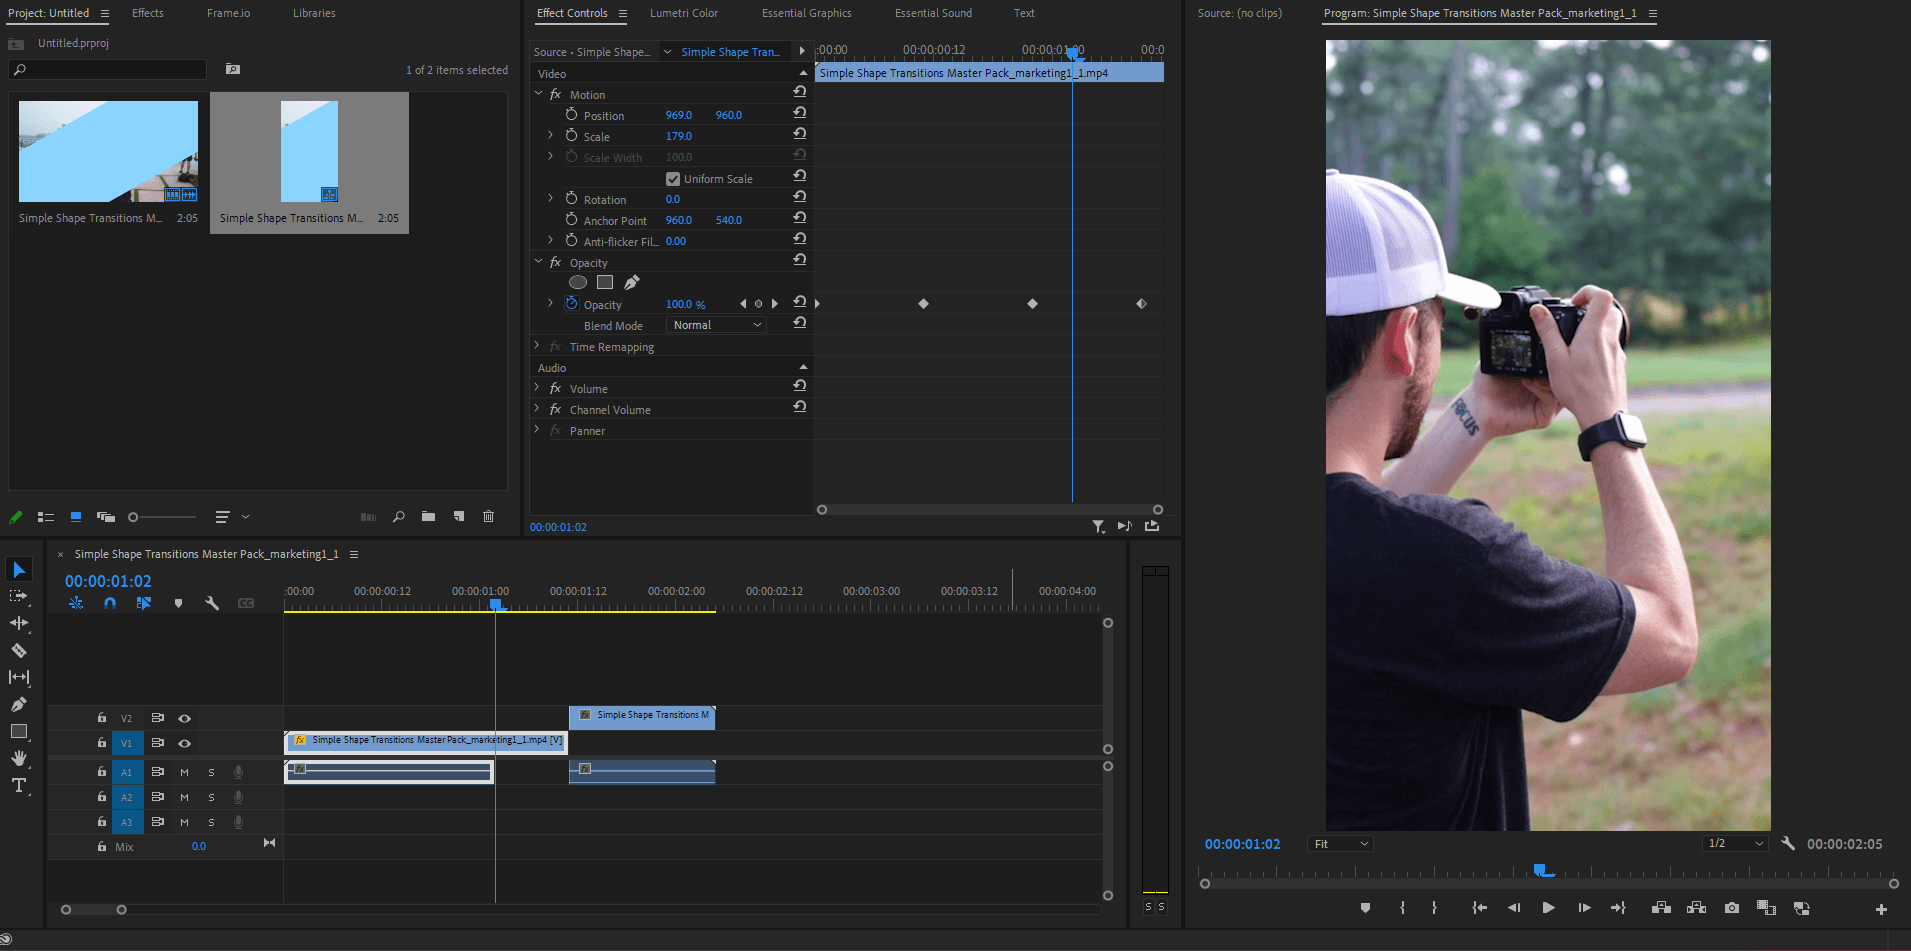
Click the blue dropdown box with two arrows in the program monitor to access resolution choices. Try reducing the resolution to 1/2 or 1/4 to improve playback speed, and don't worry, setting a lower resolution will not affect your final export quality.
2. Drag and Drop Import
A simple hack in our list of Premiere Pro tips is to drag and drop clips into Premiere Pro rather than using the user interface to import them.
Rather than navigating the pop up window and other menus to bring your files into Premiere Pro, it's much easier to have the file explorer open and drag and drop the clips onto your timeline.
Depending on how you edit videos, this can be a simple way to save a bunch of time when your adding new media to your edits on the fly.
3. Sync Audio Clips
One useful tip for beginners is to take advantage of Premiere Pro's synchronize audio command.
This allows you to automatically sync audio recordings from separate devices with your video clips. For example, if you used your phone alongside a separate microphone for a shot, you can perfectly sync the microphones audio to your footage.
Simply select your video clip and external audio clip in the timeline, right click, and choose "Synchronize." This saves you time manually aligning separate audio and video clips recorded during a shoot, and more importantly it makes sure the alignment is perfect!
4. Keyboard Shortcuts
Mastering even just a few basic keyboard shortcuts will speed up your editing workflow tremendously.
Prioritize learning shortcuts for basic editing tasks like razor cutting clips and selecting tools. The Alt key can also modify many shortcuts, so get comfortable using it.
Here are some of my most frequently used keyboard shortcuts in Adobe Premiere Pro:
- C: Razor Tool - allows you to cut and trim audio and video clips
- V: Selection Tool - default setting allows you to select and drag clips
- I: Set In Point - marks the beginning of the section of the clip you wish to use
- O: Set Out Point - marks the end of the section of the clip you wish to use
- S: Toggle Snap - enables or disables the snap function
- + / -: Zoom In/Zoom Out on Timeline
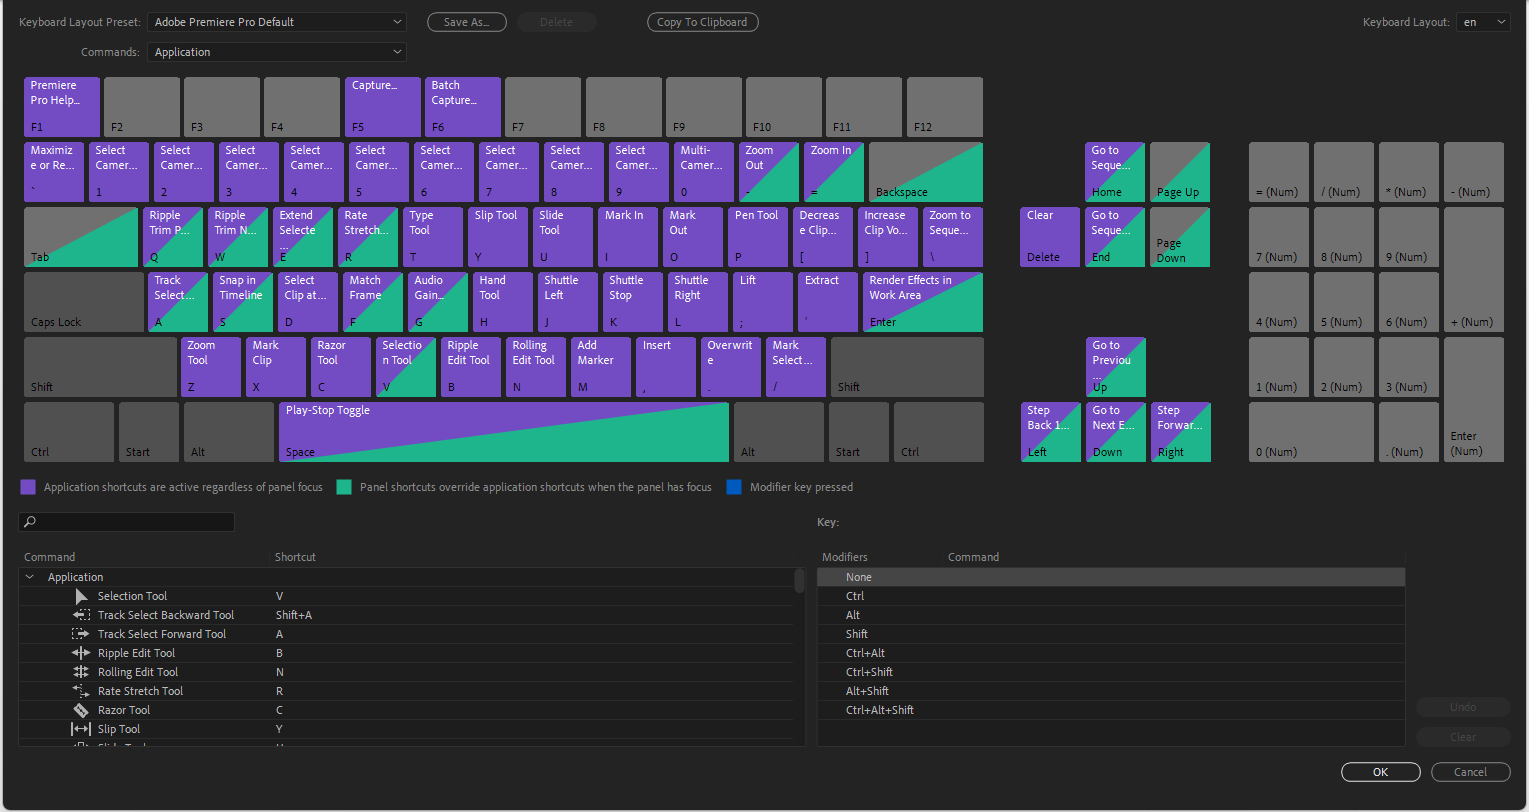
You can also edit the default keyboard shortcuts by going to Edit > Keyboard Shortcuts, find the command, assign a new key, check for conflicts, save as a preset, and click OK.
With some practice, keyboard shortcuts will become second nature, allowing you to edit faster and stay focused on your creative vision.
5. Delete Unused Tracks
Deleting unused tracks in your Premiere Pro timeline is an easy way to clean things up and make your editing way more efficient.
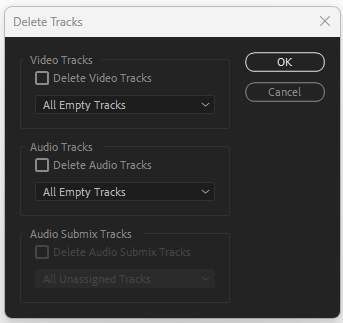
Simply right click on a blank area of the track header and select “Delete Track” to remove any video or audio tracks you aren’t using. You can also opt to delete all empty tracks in one operation by right clicking an unused area in the timeline editor and selecting "Delete Tracks" then "All Empty Tracks" in the dialog box.
Getting rid of extra tracks declutters your timeline and makes it easier to navigate when editing multiple clips.
6. Unlink Audio and Video Clips
When you import a video clip with audio into Adobe Premiere Pro, the audio will be attached by default which can be problematic if you want to use a different audio track for the clip.
So rather than just muting the audio track, select the clip then right click and choose “Unlink” to separate the audio and video components. This allows you to move or delete the audio and video as independent elements.
7. Toggle Snap
The Snap toggle in Premiere Pro causes clips you move or trim to jump to exact timeline positions. This helps lining things up but while not immediately obvious, it can sometimes hinders precise editing.
Toggling Snap off by pressing the S key gives you the control to place clips anywhere in a sequence. With Snap disabled, you can trim edits gradually instead of having them jump to set positions etc.
New Premiere Pro users should know this keyboard shortcut for disabling Snap when needed for finer editing.
8. Use Transitions
Using transitions between clips is one of the easiest ways to make your edits in Premiere Pro look more professional and polished.
To add transitions to Premiere Pro, simply drag a transition from the Effects panel onto the cut between two clips on your timeline. You can adjust the transition duration and style to create seamless transitions between scenes.
Another trick that will take your edits to the next level is to use custom transition packs. By using an online video preset marketplace like Content Creator Templates to find new and unique transitions, you can forget about those repetitive effects that everyone else uses.
Always remember to use transitions sparingly and purposefully, like between major scenes or story beats.
9. Learn Keyframes
Keyframes in Premiere Pro are a powerful technique you can use to make new audio and video effects or customize existing ones.
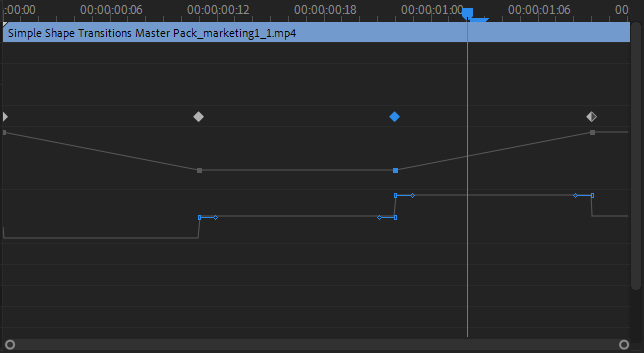
By setting keyframes on a clip or effect property at specific points in time, you can create controlled changes or animations as the video plays. When getting started, it's essential to understand how to add, delete, and adjust keyframes in the Effect Controls panel.
Here, you can also 'show clip keyframes,' a feature that allows you to visualize the keyframe placements directly on your clips in the timeline, making adjustments even easier.
Mastering keyframes may seem intimidating at first, but you'll find it becomes more intuitive with practice.
10. Setup Auto Save
There's nothing worse than losing hours or work due to a crash or another issue with Premiere Pro.
One of the most useful Adobe Premiere Pro tips for beginners is to setup auto save in your project settings.
Navigating to Edit > Preferences > Autosave and enabling auto save can prevent some major headaches. Set it to save your project incrementally every 2-5 minutes so if Premiere Pro crashes, you won't lose much work!
11. Use Overlays
Overlays are a great way to enhance your video projects in Premiere Pro, and considering how simple they are to use it's a great idea for beginners to implement overlays right away.
Overlays allow you to easily add customizable titles, lower thirds, subtitles, shapes, logos, and more to you Premiere Pro project.
Use an online marketplace to find and download custom overlays, then simply drag and drop the desired overlay onto your timeline above your video clips. Double click the overlay to edit the text, colors, positioning, and animation effects.
Overlays are the perfect way to brand your videos, add subtitles, introduce interview subjects, and convey other on-screen information to elevate your productions.
12. Program Monitor Toolbar
The Program Monitor Toolbar in Adobe Premiere Pro is your control center for video playback.
Located below the Program Monitor, this toolbar is equipped with essential buttons like "Play," "Stop," and "Rewind," as well as timecode displays. It's not just for playback; you can also add markers or even export a single frame directly from this toolbar. For beginners, familiarizing yourself with these controls is key. They offer a streamlined way to review and navigate through your edits, enhancing your editing efficiency.
13. Nesting Sequences
Timeline nesting sequences is a useful Premiere Pro tip to simplify your timeline, and it's a great way to simplify your larger edits.
To nest clips, highlight and right click multiple clips in a sequence, then click "Nest." This will place the clips into a nested sequence that shows up as one clip. You can edit the nested clip by double clicking the nested block on your timeline.
14. Change Display Layout
One of the most useful Adobe Premiere Pro tips for beginners is to customize the display layout to suit your workflow.
The default layout may not be optimal for the kind of editing you do. For example, if you often edit short form content in the 9:16 aspect ratio you might want to edit in the 'vertical' arrangement.
Choose a pre-built layout or create a custom workspace with the panels you need. Rearranging panels is easy - just drag and drop.
To reset your display layout navigate to Window > Workspaces > Reset to Saved Layout. You can also save custom layouts here too.
15. Use LUTs
LUTs (lookup tables) are a great way to quickly color grade your footage in Premiere Pro and keep consistency across edits.
Simply apply a LUT onto a clip or adjustment layer to get a stylized look. Experiment with the many free and paid LUT packs available to easily get a cinematic, faded, or vibrant effect.
LUTs instantly transform the color and mood of clips without having to manually adjust color wheels. They save time color grading and provide creative flexibility.
16. Leverage Motion Tracking
One powerful feature in Premiere Pro is motion tracking, which can track an object in a clip and apply effects that follow it.
For example, you can track a person walking across a scene and blur their face. Motion tracking is also useful for adding text or graphics that follow a moving object.
By investing some time learning motion tracking, you'll take your edits to another level and save yourself a bunch of time in the long run!
17. Use Adjustment Layers
Adjustment layers allow you to apply effects to multiple clips at once.
To use them, create a new adjustment layer in your project panel. Drag the adjustment layer above the clips you want to affect in the timeline. Now any effects you apply to the adjustment layer, like color grading or blurs, will be applied to all the clips below it.
By using an adjustment layer in your edits you'll save a huge amount of time by not having to apply effects to multiple clips.
18. Clip Stabilization
Shaky footage is inevitable when filming handheld, but Premiere Pro has built-in tools to easily stabilize clips.
Go to the effects panel and drag in 'Warp Stabilizer' to your desired clip. Premiere analyzes the footage and removes excess camera motion, resulting in a steadier shot!
Clip stabilization is an easy way to improve handheld or shakey shots right in Premiere.
19. Audio Ducking
Audio ducking is an effective technique in Premiere Pro to automatically lower the volume of background audio when dialogue or other important sounds occur.
Simply add the ducking effect to the music track, set the dialogue track as the ducking source, and adjust ducking levels. This ensures dialogue clarity while keeping background audio present.
Ducking will save you a bunch of time if you're editing content with multiple audio layers.
20. Create Captions and Subtitles
Adding captions and subtitles is easy in Premiere Pro and provides greater accessibility.
Go to the captions and graphics panel and click Transcribe. Premiere Pro will automatically generate a transcription for your video content. From here you can generate customized closed caption subtitles.
Adjust timing and placement as needed. You can export the captions file to share or embed with the video.
21. Ripple Sequence Markers
Ripple Sequence Markers are a small but powerful feature in Premiere Pro that can streamline the editing process.
When you're just starting out, you'll likely use markers to label important moments or edits within your clips. The Ripple Sequence Markers setting ensures that these markers stay "glued" to their respective clips, even if you later decide to trim or move those clips around on the timeline.
This automated adjustment saves you from the tedious work of manually relocating markers after each edit, allowing you to focus on the creative aspects of your project.
22. Custom Video Presets
One of the most useful yet underutilized features in Premiere Pro are custom video presets.
The Effects Panel contains a folder called Video Presets where you can import your own custom LUTs, overlays, transitions, text effects, and more.
Applying these presets instantly changes the look of your clip without having to manually adjust numerous effect settings. Video presets are a huge time saver for common effects you apply regularly like creating a vintage look or boosting color saturation.
23. Dynamic Trim
Dynamic Trim is a feature in Premiere Pro that lets you quickly adjust the beginning or end of a clip while seeing the changes in real-time.
Move your cursor over the edge of a clip until a trim icon shows up. Click and drag to extend or shorten the clip. Adjacent clips will automatically move to fill in the gap or make room, which is known as "rippling."
This feature saves you the steps of manually adjusting each clip edge and then rearranging the other clips to fit. For precise control, you can enable snapping or hold the Shift key while dragging.
24. Use Proxies
Working with high resolution media files can slow down Premiere Pro's performance, by using Proxy files we can greatly reduce the computational load from Premiere Pro.
Right click your clips in the Project panel and select Proxy > Create Proxy. Premiere will generate lower resolution copies of your clips to use in your sequence.
Editing will now be faster and smoother. When you're ready to export, right click the clips again and select "Proxy > Attach Full Resolution Media" to relink the original high res files.
Using proxies gives you full editing speed without sacrificing final quality and it's a simple way to boost productivity in Premiere when working with large projects.
25. Artificial Intelligence Features
Harness the power of Adobe Sensei's AI capabilities to elevate your video editing in Premiere Pro.
Use Scene Edit Detection to automatically identify and cut between different scenes saving massive time on larger projects.
Auto-reframe intelligently identifies the action's focal point and adjusts the frame, saving time when adapting videos for various social platforms.
Enhance your audio effortlessly with Adobe Audition's Remix feature, which uses AI to adjust your music track to fit the original clip.
These AI-driven tools not only save time but also augment the creative potential of your projects.
26. Dynamic Link with After Effects
The Dynamic Link feature bridges Premiere Pro and After Effects.
Rather than rendering finished clips, Dynamic Link creates a live link between apps. Make changes to an After Effects composition, and it updates within your Premiere timeline. Open Premiere sequences directly in After Effects for additional editing too.
Dynamic Link eliminates frustrating round tripping. Use it to polish visual effects, motion graphics, titles and more without re-rendering. Using the dynamic link workflow saves tons of time and effort.
27. Media Encoder
Adobe Media Encoder is an invaluable tool for streamlining your video editing workflow in Premiere Pro.
Not only can you batch export multiple sequences, but you can also handle long clips more efficiently. If you're working with a duplicate clip or similar assets, you can queue them up in Media Encoder and continue editing in Premiere Pro without any slowdown. This is especially helpful for long clips that require significant time to render.
By utilizing Adobe Media Encoder, you can offload the task of rendering and exporting, allowing you to focus on the creative aspects of your project.
Wrapping Up
Mastering even a handful of these Adobe Premiere Pro tips and tricks will enhance your video editing skills and efficiency.
Don’t feel overwhelmed trying to learn them all at once. Focus on understanding one or two new techniques per editing session.
Before you know it, these pro tips will become second nature and you'll be editing like an absolute pro!

Anthony Gallo
Anthony Gallo is the cofounder of ContentCreator.com and lead educator in the online course 14 Day Filmmaker, that has taught over 100,000 aspiring creators how to shoot & edit professional video content with PRO and SMARTPHONE cameras.
Having created content in a variety of industries including commercial advertising, weddings, music videos, and hundreds of youtube videos, Anthony has amassed over 50 million views online and is constantly looking for new and engaging ways to create content and help others master this amazing craft.