How to Add Text in Premiere Pro in 2 Minutes or Less
Last UpdatedApril 30, 2024
by
Anthony Gallo
Have you ever noticed the professional-looking text animations that creators use in their video content?
Chances are you have, whether it was conscious or not.
That's because text animations are a powerful way to better engage your audience, and level up the quality of your content.
In Adobe Premiere Pro, you can easily incorporate text into your videos to do exactly that.
In this tutorial, I’ll guide you through the steps of adding and customizing text in Adobe Premiere Pro.
Whether you're looking to introduce a video, add subtitles, or display credits, Premiere Pro offers the tools to do it with style and efficiency. 👇
Key Takeaways (TLDR) 😴
- Add basic text to Premiere Pro using the "Type" tool to the left of the timeline panel
- Animate basic text in Premiere Pro by using keyframes
- Use rectangles, multiple layers, and keyframes to create advanced text animations
- Adding captions and subtitles in Adobe Premiere is super simple with the inbuilt transcribe and caption functionality
- Using online templates is the simplest and easiest way to get started using pro grade text, titles, and thirds.
Why Use Text in Premiere Pro?
Adding text in Adobe Premiere Pro can elevate your videos, providing viewers with useful information, enhancing storytelling, and improving engagement.
Mastering how to add text in Premiere Pro not only improves your video editing skills but ensures your content can be consumed by everyone, even in silent playback scenarios.
Platforms like Instagram or Facebook, where many users prefer muted viewing, using text annotations is critical for delivering your message effectively.
Adding text in Premiere Pro also allows you to customize your content with a unique touch or specific branding.
Choosing the right custom font enhances the aesthetic appeal of your videos, making them memorable and professional.
Adobe Premiere Pro provides all these tools to enhance your videos with text and more!
Now, let’s dive deeper into the steps on how to add text in Premiere Pro and explore how to make the most out of these features!
How to Add Basic Text and Titles in Premiere Pro
1. Select the Type Tool
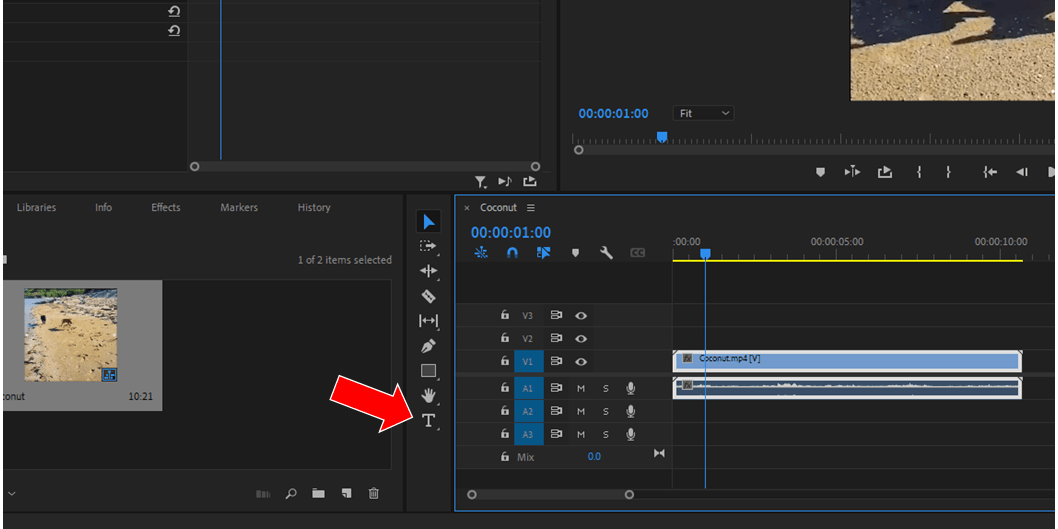
Locate and click the Type Tool found on the left side of the timeline. Click anywhere on the video preview in the program monitor to start typing your desired text.
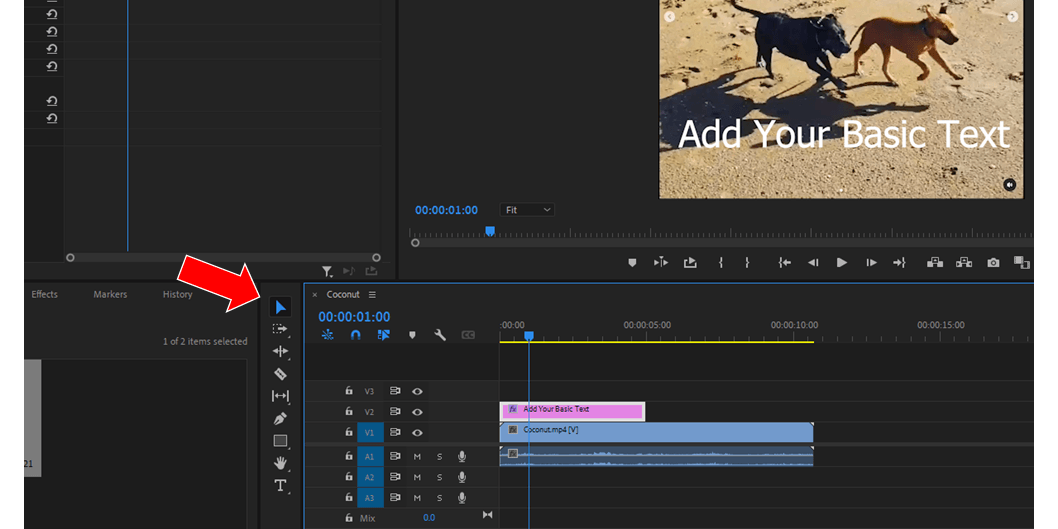
Once you have added text to your text box, click the cursor icon above the type tool icon to adjust the location and size of your new text box.
2. Edit Your Text
Adobe Premiere Pro will automatically create a new text layer (displayed as a pink clip above the video clip on the timeline).
- Position: Drag the text box center in the video preview to adjust the position of the text.
- Duration: Drag the edges of the pink text clip on the timeline to alter how long the text appears in the video.
3. Modify Text Properties
To access and adjust more text attributes, click the text box on the timeline panel then do the following:
- Navigate to the Effect Controls panel.
- Under "Text", change the font using the drop-down font menu, adjust the size, style (bold or italic).
- Under "Appearance" within the text menu, you can alter the text color by clicking the color box next to 'Fill'.
- Add an outline to your letters (stroke) by checking the corresponding box and selecting the stroke color and width.

- Adjust Motion and Opacity in the relevant menus in the Effect Panel.
4. Finishing Touches
Review the text position, duration, and properties. Make any necessary adjustments to ensure it meets your project's needs.
Animating Text in Premiere Pro with Keyframes
Adding keyframes in Premiere Pro is an amazingly simple way to make your text templates pop in your YouTube videos.

To animate text in Adobe Premiere Pro using keyframes, follow these simplified steps:
1. Navigate to Effect Controls
- Select Text Layer: Click on the text layer you added in the previous section from the timeline.
- Open Effect Controls: With the text layer selected, open the 'Effect Controls' panel to access animation properties.
2. Create Initial Keyframe
- Position Playhead: Move the playhead in the timeline to the point where you want the text animation to begin.
- Toggle Animation: In the 'Effect Controls' panel, find the property (e.g., position, scale) you want to animate. Click the stopwatch icon next to it to create the first keyframe.
3. Insert Additional Keyframes
- Move Playhead: Advance the playhead to another position on the timeline where you want to modify the text animation.
- Adjust Property: Change the property (position, scale, etc.) to its new value, automatically creating an additional keyframe.
- Repeat as Needed: Add more keyframes if the animation requires.
4. Fine-Tune Animation
- Modify Keyframes: If necessary, adjust the timing and values of your keyframes in the 'Effect Controls' panel to refine the animation.
- Utilize Graphs: For precise control over the animation’s speed and easing, use the value and velocity graphs.
5. Preview and Finalize
- Preview Animation: Use the preview window to check the animation. Adjust keyframes as needed for desired timing and motion.
- Complete Editing: Once satisfied with the text animation, finalize and export your video project.
Adding Advanced Titles and Lower Thirds in Premiere Pro
If the basic text functionality isn't quite enough for your liking, consider using some advanced tricks to take your titles and lower thirds to the next level.
Here's a basic tutorial with some easy tricks to step up your text game. 👇
1. Open Essential Graphics Panel
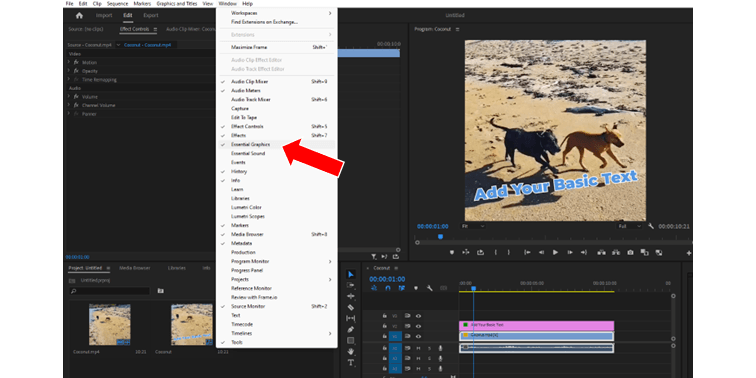
- Start by going to the Window menu at the top and select Essential Graphics to open the panel necessary for creating graphics.
2. Draw Background Rectangle

- Use the Rectangle Tool from the toolbar on the left of your timeline panel to draw a rectangle in the video display panel. This will serve as the background for your text.
- Change the fill color of the rectangle (e.g., to white).
- Click the layer in the Essential Graphics panel and rename it for easy identification (e.g., "Rectangle 01").
3. Enable Safe Margins
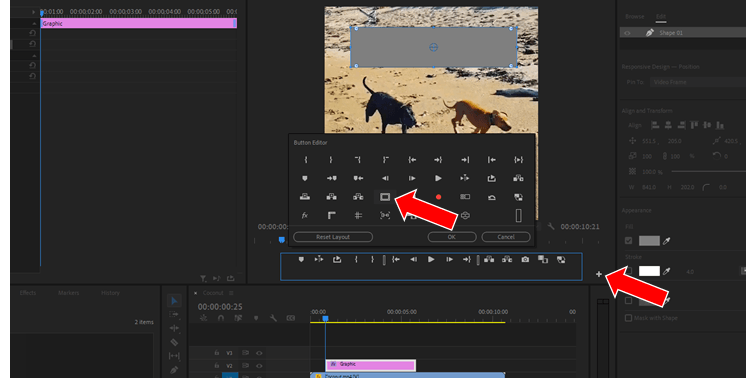
- To ensure your text is well positioned and visible across all devices, enable Safe Margins. Click on the "+" icon below the video display panel
- Click and drag the Safe Margins icon to the panel below
4. Add Text
- Following the procedure outline earlier in the article, select the Text Tool from the toolbar.
- Click within the drawn rectangle and type your required text (e.g., a name).
- Adjust the font, size, and position using the Edit Tab in the Essential Graphics panel.
- To center your text and rectangle, click and drag to highlight the two items, then click the relevant icon under "Align and Transform" in the Essential Graphics panel.
5. Group Layers
If using video inside text, select both the text and video layers, right-click and choose the "Group" option to bind them together. This helps in applying effects uniformly to these elements.
6. Animate Your Graphics
- To bring life to your lower thirds, consider applying animation effects like position changes or scale transformations using keyframes in the Effect Controls panel.
- Enhancements like motion blur (using the Shutter Angle adjustment under the Transform effect) can add a natural feel to the animation.
7. Fine-Tune and Preview
- Scrub through your timeline to preview the animation.
- Make any necessary adjustments to timing, positioning, or effects to ensure the lower third appears polished and professional.
If you want to learn more, there's literally hundreds of tutorials on YouTube that can help you add unique and advanced titles and lower thirds in Premiere Pro, check them out!
Adding Subtitles and Captions in Premiere Pro
Adding captions and subtitles in Premiere Pro is super easy thanks to its Transcript and Captions panel!
- In the Edit tab click the text panel. If you can't see the text panel, add it to your Edit tab by clicking Window > Text
- Navigate to the Transcript panel and click "Transcribe". Premiere Pro will automatically transcribe your video
- Now to add captions, navigate to the Captions tab and click "Create captions from transcript"
It's that simple!
You can customize your subtitles and captions the same way we have done previously in the article. Remember to apply your changes to all captions when your happy with them.
Enhancing Text Using Online Templates
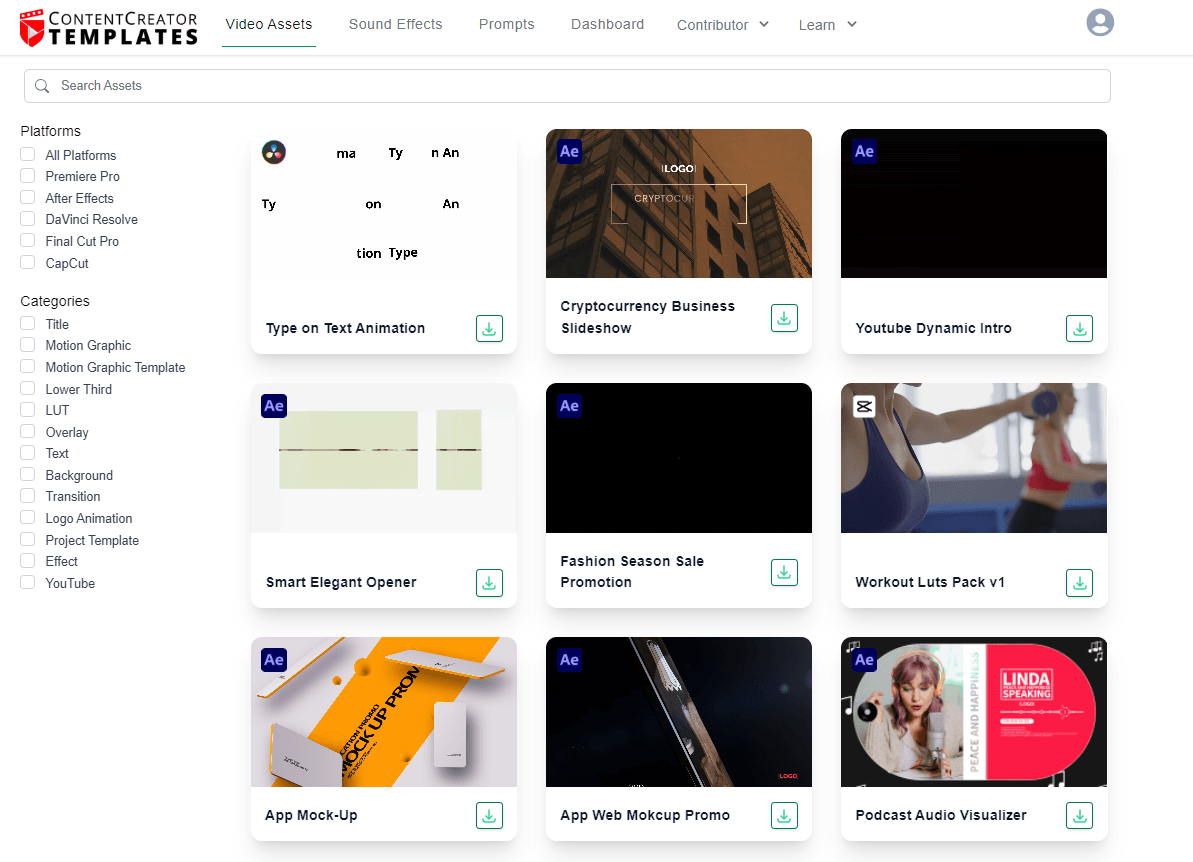
If you're looking to save a massive amount of time working on advanced text methods in Premiere Pro, then pre made title templates and motion graphics template are for you!
Taking advantage of online templates allows you to benefit in many ways including:
- Time-Saving: Utilize premade title templates and motion graphics to significantly reduce content creation time in Premiere Pro.
- Enhanced Quality: Access to professionally designed templates elevates the aesthetic and functionality of text presentations.
- Ease of Use: Templates offer a user-friendly option with minimal effort required for customization, making advanced text methods accessible to all skill levels.
Here at Content Creator Templates we offer literally thousands of text and title templates and lower thirds assets that you can be using in minutes.
Simply sign-up and start downloading your assets right away!
Tips and Tricks for Effective Titles and Text in Premiere Pro
Here's some basic reminders for creating effective titles, text, and lower thirds in Premiere Pro. Add this page to your favorite bar and come back sometime!
- Utilize the Type Tool to type directly onto the program preview to start creating your desired text for the desired video file.
- Access the Graphics Workspace to efficiently manage and customize text properties like font style using Adobe Fonts, which offers a wide variety of options to enhance the aesthetic appeal of your video content.
- Introduce a blank captions layer for subtitles, ensuring you can add and customize text easily. This helps in maintaining consistency across your video without altering video content directly.
- Modify your text's properties from the Essential Graphics Panel where you can select Adobe Fonts, adjust size, enable bold or italics, and manipulate the font style to match your brand or video’s tone.
- Animate your text using keyframes in the Effect Controls panel. Start by creating an initial keyframe for properties like position or scale, then insert additional keyframes to progress the animation based on your creative needs.
- For subtitles and captions, use Premiere Pro’s transcript and captions tools to auto-generate text, which can then be customized using a blank captions layer, allowing for uniform style adjustments across all captions.
- Explore Advanced Titles and Lower Thirds by designing with tools found under the Essential Graphics panel. Utilize background shapes, align text, and employ animation to make text elements like lower thirds more dynamic and engaging.
- Maintain readability and professional aesthetics by adhering to safe margins to ensure your text is visible across various devices and user settings.
- Employ online templates for quick, professional-quality titles and motion graphics. This can dramatically reduce editing time and enhance the video’s professional look.
Wrapping Up
Today we learned how to add text in Premiere Pro, looking at beginner methods all the way up to advanced text animations with keyframes.
Implementing what we learned here will level up your content and better engage your audience.
Consider using online options to save time when creating text animations!
Happy editing. 😎

Anthony Gallo
Anthony Gallo is the cofounder of ContentCreator.com and lead educator in the online course 14 Day Filmmaker, that has taught over 100,000 aspiring creators how to shoot & edit professional video content with PRO and SMARTPHONE cameras.
Having created content in a variety of industries including commercial advertising, weddings, music videos, and hundreds of youtube videos, Anthony has amassed over 50 million views online and is constantly looking for new and engaging ways to create content and help others master this amazing craft.