How to Add Keyframes in DaVinci Resolve: Step-By-Step Guide
Last UpdatedSeptember 30, 2023
by
Anthony Gallo

Learning how to add keyframes in DaVinci Resolve is like giving yourself a video editing superpower. Keyframes are used for animations, effects, transitions, audio tweaks, and many other things.
Having a decent understanding of how to incorporate keyframes into your video editing is essential to create smooth transitions and control various parameters within your edit.
In this DaVinci Resolve tutorial, I’ll show you exactly how to add keyframes, adjust, and change keyframes, and also how to remove keyframes in DaVinci Resolve. We'll also take a look at some advanced techniques for those of you wanting some extra spice!
Let's get into it. 👇
What Are Keyframes Used For in DaVinci Resolve?
Keyframes are like markers that tell the software when and how to change a specific parameter in your video or audio. For example, you can use them to make a picture move across the screen, or to gradually make a scene brighter.
Keyframes mark specific points on your video clip timeline where a change begins or ends. Here are the most common uses of keyframes in DaVinci Resolve:
- Motion Control: You can animate an object's position, scale, or rotation over time.
- Color Grading: Parameters like brightness, contrast, and color can be adjusted dynamically throughout a clip. This is especially useful when you're looking to maintain the same look across different scenes and can complement the use of LUTs for a consistent style.
- Audio Manipulation: Volume levels, panning, and other audio attributes can be altered over the course of playback.
- Special Effects: Keyframes help in controlling various special effects parameters, like the intensity of a blur.
- Transitions: Customized transitions between clips can be created by altering properties like opacity or crop settings.
- Text and Titles: Parameters like size, location, and even the text itself can change over time.
- Speed Changes: Variable speed changes in a clip can be managed using keyframes.
- Zoom and Pan: Creating a Ken Burns effect where the camera appears to zoom into or pan across a still image.
As you might have noticed, keyframes are how most audio and video effects are built in DaVinci. DaVinci Resolve offers excellent keyframe capabilities, and are a great fundamental concept to nail before you move into more advanced editing techniques.
How to Add Keyframes in DaVinci Resolve
The good news is that adding, removing, and modifying keyframes in DaVinci Resolve is super simple when using the user-friendly keyframe editor. Let's get into the specifics and walk through adding keyframes in DaVinci Resolve.
1. Import Media
- Import your video, audio, and image assets into DaVinci Resolve as normal and drag onto the timeline.
- Once you're setup, navigate to the Edit page in DaVinci Resolve where we'll access the keyframe editor.
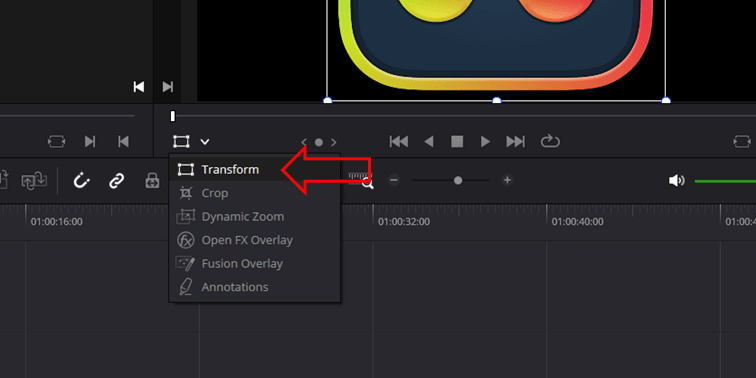
- As seen in the image below, under the preview window, click the dropdown and make sure the Transform controls are enabled for on-screen adjustments like position, scale, and rotation. This will make it easier to understand what’s going on later.
- Now, open the Inspector panel by clicking ‘Inspector’ in the top right above the preview window and switch to the Video tab.
2. Set The Start Keyframe
- Move the playhead to the point on the timeline where you want the effect to start. The location of the playhead will be where your first keyframe will be placed.
- Use the on-screen controls in the inspector panel to position, scale, or rotate your element for the starting point you want.
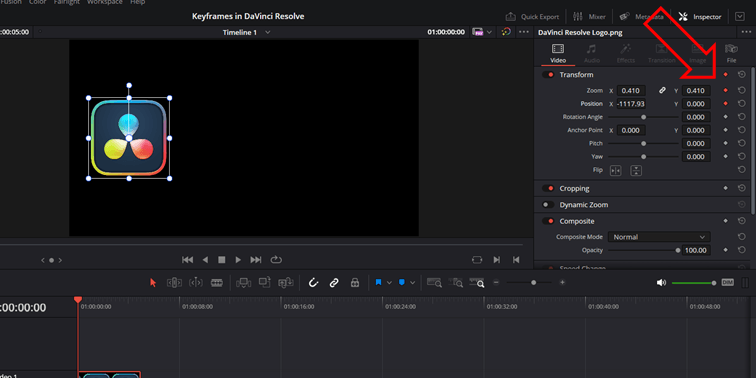
- In the Inspector, click the diamond-shaped icon next to the transform parameter(s) you wish to animate. The icon will turn red/orange, signaling that a keyframe has been set. In my example as you can see below, I’ve set keyframes for Zoom and Position with the playhead located at 0:00.
3. Set An End Keyframe
- Move the playhead away from the previous keyframe to where you want the animation to end, or where you would like to put a second keyframe.
- Adjust the on-screen controls for the ending position, scale, rotation, or whatever effect you’re using. For precision, you can to enter the coordinates manually, or you can simply click and drag.
Pro tip: If you hold the shift key when dragging, your item will stick to the X or Y axis.
- A curve icon (red line) will appear on the preview screen, illustrating the path of the animation.
- Optionally, you can add more keyframes along this path for complex animations, but we’ll stick to a simple start and finish keyframe for the beginner section of this DaVinci Resolve tutorial.
4. Adjust the Animation Curve
- To edit a specific keyframe, make sure you move your playhead to the location of the keyframe! You can also click the arrows beside the keyframe diamond, or click the animation points of the preview window.
- Right-click on the keyframe diamond icon.
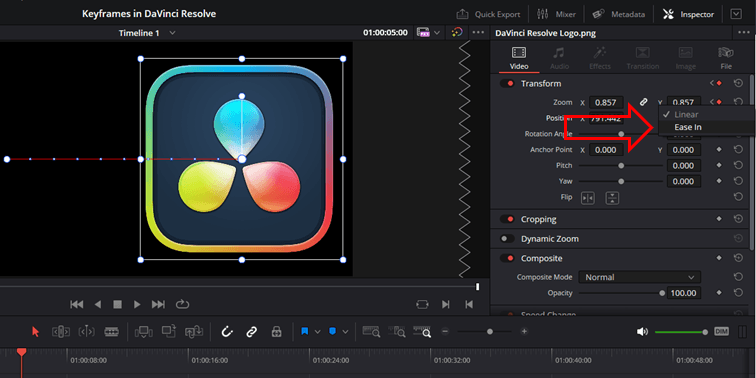
- Select either Ease In, Ease Out, or Linear to control the animation’s pacing. Ease In/Out will give your animation a smoother start and finish respectively, which will look a lot better in most videos.
5. Preview and Navigate
- Play back the timeline to preview your animation.
- Use the diamond-shaped keyframe icons in the Inspector or directly on the preview screen to quickly navigate to specific keyframes for further adjustments.
As you can see below I created a simple animation of the DaVinci Resolve logo moving from left to right while increasing in size. Simple!

How to Remove Keyframes in DaVinci Resolve
There will always come a time where you want to remove additional or unnecessary keyframes in DaVinci Resolve. There's a few different ways to remove keyframes in DaVinci Resolve depending on your settings and what you want to achieve.
- Remove a Single Keyframe: Right-click the desired keyframe in the preview screen and select ‘Delete Keyframe’.
- Batch Remove Keyframes: To remove keyframe effects entirely, click the circular arrow next to the keyframe diamonds in the Inspector panel. This will remove all keyframes and animation effects you have applied. (Remember you can always undo if you hit this by accident!).
Once you've modified or removed your extra keyframes, scrub through the timeline or play it back to ensure that the keyframe removal has achieved the desired effect. This is where you'll want to fine tune if needed.
How to Change Keyframe Values in DaVinci Resolve
We've touched on this so far already but it's worth repeating it specifically here for those that are completely new to dynamic keyframes and playing with a second keyframe or more!
To change specific keyframe values in DaVinci Resolve without messing up the whole animation you'll want to do the following:
- Select Keyframe: Click on the specific keyframe icon in the preview screen to select it. Alternatively, use the arrow keys beside the keyframe diamond in the Inspector to navigate between keyframes.
- Make Adjustments: With the keyframe selected, alter the parameters. The adjustments will automatically be updated on the selected keyframe.
- Modify Timing: To change the timing of the keyframe, simply click and drag the keyframe diamond icon along the timeline to your new desired time.
- Copy/Paste Keyframes: To duplicate keyframes, you can select them and use the copy (Cmd/Ctrl+C) and paste (Cmd/Ctrl+V) commands. This is useful for repeating identical movements or effects.
- Update Animation Curve: If you want to change how the animation flows between keyframes, right-click on the keyframe diamond icon, and select the desired curve type (Ease In, Ease Out, or Linear).
- Confirm Changes: After making all your adjustments, review the timeline to ensure the keyframes are behaving as expected.
Advanced Keyframe Techniques
If you really want to get your hands dirty with the keyframe editor in DaVinci Resolve, here's so advanced ideas you can try on your next video editing project!
- Dynamic Keyframe Zoom: Dynamic zoom uses keyframes to create a smooth zoom-in or zoom-out effect. This technique is great for focusing on specific parts of your footage or creating dramatic reveals.
- Keyframe Color Changes: Keyframing color changes allows you to dynamically alter the color grading of your footage over time. Use this for scenes that transition from day to night, to emphasize mood changes, or to highlight specific moments in your storyline.
- Audio Keyframing: Advanced audio keyframing involves manipulating audio levels and effects over time for unique and out-of-the-norm sound effects.
- Motion Tracking: Combining motion tracking with keyframes enables you to attach objects or effects to moving elements within your footage. Attach text to moving objects, apply effects that follow a character, or create dynamic interactions between elements in your scene.
These are just a few of the advanced effects you can create in your videos using the keyframe editor in DaVinci Resolve! It's really quite powerful for making cool and unique video effects.
Wrapping Up
Whether you're adding custom text effects, creating a custom title, or adding transitions, mastering the use of keyframes in DaVinci Resolve opens up new creative possibilities for your video projects.
From the basics of adding and removing keyframes to fine-tuning them for more complex animations, you now have the tools to bring your vision to life! Happy editing!

Anthony Gallo
Anthony Gallo is the cofounder of ContentCreator.com and lead educator in the online course 14 Day Filmmaker, that has taught over 100,000 aspiring creators how to shoot & edit professional video content with PRO and SMARTPHONE cameras.
Having created content in a variety of industries including commercial advertising, weddings, music videos, and hundreds of youtube videos, Anthony has amassed over 50 million views online and is constantly looking for new and engaging ways to create content and help others master this amazing craft.