How to Add Transitions in DaVinci Resolve in 4 Steps
Last UpdatedOctober 7, 2023
by
Anthony Gallo
If you're looking to add a professional touch to your videos in DaVinci Resolve, you're in the right place.
From existing transition options like the popular cross dissolve, to professionally crafted custom transitions, DaVinci Resolve offers a range of choices to elevate your transition game.
In the article, we'll walk through various methods to implement seamless transitions in DaVinci Resolve, from the super simple and fast, to the more involved options for advanced users.
How Do You Add Transitions in DaVinci Resolve?
Depending on what you want to do exactly, there are a range of ways you can implement seamless transitions to your video clips and images.
You can opt to bulk add the same transitions to all your clips, you can add default transitions manually from the effects library, you can make your own custom transitions, or you can import professionally created transitions!
Let's take a closer look at adding DaVinci Resolve transitions with each of these methods. 👇
1. Bulk Add Multiple Transitions Super Fast in DaVinci Resolve
If you're not worried about using the same transition between every clip then this is the perfect method for you!
To bulk add transitions in DaVinci Resolve simply highlight all the clips you want to add transitions to in the Edit tab and press CTRL/Command T.
This will automatically add default transitions to all the selected clips.
To change the default transition in DaVinci Resolve simply navigate to the effects library and find your transition of choice, then right click and select 'set as standard transition'. Simple!
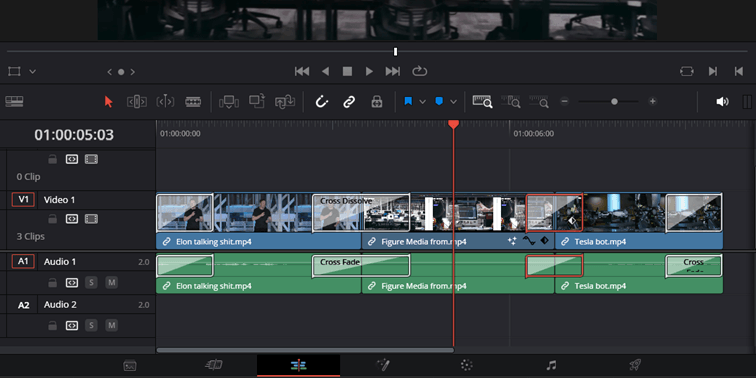
2. Add Transitions Manually From the Effects Library
Adding transitions in DaVinci Resolve from the effects library isn't much more involved than the first method here, except you're adding transitions manually to your clips.
Navigate to the Effects tab and Video Transitions tab. All you need to do now is drag and drop your desired transition onto your clips!
Try hovering your mouse over the transition presets to get a preview.
If you're trying to add video transitions to the center of your two clips but it won't work, it often means you don't have enough length on the start or end of the clip! Try shuffling your clip and giving some additional length that the transition can use.
3. Make Custom Transitions in DaVinci Resolve
To create custom transitions in DaVinci Resolve is a bit more involved and requires a few more skills including working with keyframes and fusion effects. Here's an example workflow of a basic transition with text display.
- Add a Fusion Composition: Navigate to 'Effects Library > Toolbox > Effects' and drag a 'Fusion Composition' between the two clips where you want the transition to occur.
- Enter Fusion Mode: Click on the 'Fusion' tab at the bottom of the screen.
- Create Background and Text Nodes: Add a 'Background' node and a 'Text' node to the node editor. Connect the background node to the MediaOut node.
- Add Keyframes: On the background and text nodes, add keyframes for attributes you want to animate, such as Position or Size.
- Animate Transition: Set the attribute values at different points on the timeline to create a smooth transition.
- Add Effects: Optionally, add any additional nodes for effects, such as 'Blur', 'Transform', etc., and adjust their settings. Make sure they are connected properly in the node tree.
- Apply Color Grading: If desired, add color correction or grading to your transition by creating a new 'Color Corrector' node. Attach this node to the rest of your node setup.
- Review Transition: Click on the 'Edit' tab again and review your custom transition to make sure it's as you envisioned.
If all that seems like too much work, you'll be interested in the next section.
4. Use Professionally Made Custom Transition Templates

Luckily for us, there are a range of websites that offer high-quality DaVinci Resolve transitions that you can download and install in minutes!
Websites like Content Creator Templates offer a wide range of the best transitions, overlays, text and titles, lower thirds, and cinematic LUTs for creating ultra dynamic videos.
To install custom transitions in DaVinci Resolve simply sign-up and download your assets, create a folder for your assets in the appropriate directory, then move your files then and unzip them.
- Windows Users: C:\ProgramData\Blackmagic Design\DaVinci Resolve\Fusion\Templates\Transitions
- MAC Users: Library\Application Support\Blackmagic Design\DaVinci Resolve\Fusion\Templates\Transitions
If you're having trouble finding the directory, try clicking the gear icon in the bottom right hand side of the DaVinci user interface, then navigate to Color management, and click 'Open LUTs Folder'. From here, you can just go up a few levels to fund the Fusion folder!
Are There Free Transitions for DaVinci Resolve?
Absolutely. As a matter of fact, if you're looking for some free DaVinci Resolve transitions, you're in the right place!
FAQs
Why won't my transitions add between two clips?
There are a few reasons where DaVinci Resolve can't add transitions to your clips.
When a transition won't add in the center of two clips this often means that one of the clips doesn't have enough frames for the transition to work with.
To fix this issue, try leaving a few extra seconds of footage (enough to account for the transition) and rejoin the clips. Your transition should now drop in the center.
How can I edit the length of my transition?
Editing the length of a transition in DaVinci Resolve is simple.
Just hover over the transition until the red drag icon appears. Drag your transition until it's the suitable length.
Alternatively, for a more accurate adjustment you can modify the length of your transition in the Inspector panel.
How can I edit the style of my transition?
To edit the style of your video transitions in DaVinci Resolve, first select the appropriate transition on the timeline and open the Inspector Panel.
In the Inspector, you'll find various parameters such as duration, angle, and effects which can be customized.
You can add keyframes next to the parameter you wish to animate, allowing for more complex transitions.
Modify attributes at different points in time to create dynamic effects. The Inspector Panel is a powerful tool in DaVinci video editing software for customizing transitions to fit your vision.
Wrapping Up
Mastering video transitions is crucial for producing seamless and engaging content.
Knowing how to add transitions in DaVinci Resolve allows video editors like you to elevate your work to professional standards.
By implementing any of these transition options, you can effectively connect video clips and maintain the viewer's attention while creating a strong brand of your own.
This skill not only enriches your video projects but also enhances storytelling capabilities, a priceless asset for anyone in today's video editing field.

Anthony Gallo
Anthony Gallo is the cofounder of ContentCreator.com and lead educator in the online course 14 Day Filmmaker, that has taught over 100,000 aspiring creators how to shoot & edit professional video content with PRO and SMARTPHONE cameras.
Having created content in a variety of industries including commercial advertising, weddings, music videos, and hundreds of youtube videos, Anthony has amassed over 50 million views online and is constantly looking for new and engaging ways to create content and help others master this amazing craft.