How to Stabilize Video in DaVinci Resolve [SOLVED]
Last UpdatedOctober 20, 2023
by
Anthony Gallo
Over the years working as a Filmmaker, I've admittedly filmed my fair share of shaky footage.
There's nothing worse than going to edit a shot and having the footage appear shaky and hard to watch.
Luckily for us, stabilizing footage in DaVinci Resolve can be done in a few easy clicks.
In this guide, I'll show you exactly how to stabilize video in DaVinci Resolve using both the Edit and Color tab, as well as outline the benefits and drawbacks of each option.
Why Stabilize Videos?
Stabilizing shaky footage is essential for producing professional-quality videos as shaky camera work can distract viewers and undermine the impact of your content.
If you can't avoid shaky videos in the pre-shoot, then you must apply some form of stabilization feature post-shoot.
DaVinci Resolve offers a range of stabilization modes, including a camera lock, rotation analysis, cropping ratio, and more.
Stabilization Features You Should Know About
DaVinci Resolve offers three stabilization modes to cater to different stabilization needs: Translation, Similarity, and Perspective. Each mode provides a unique stabilizing effect:
- Similarity Mode: Provides a more complex stabilization by analyzing pan, tilt, zoom, and rotation, making it suitable for footage with varied movements.
- Perspective Mode: Offers the most advanced stabilization by also considering complex changes in perspective, ideal for footage with unorthodox camera handling.
- Translation Mode: Focuses on basic pan and tilt analysis, making it less aggressive but potentially insufficient for more violent camera shakes.
Stabilization controls provide you with primary buttons and toggles that initiate or modify the stabilization process:
- Stabilize Button: The stabilize button initiates the stabilization process, offering a quick way to apply default settings to your footage.
- Stabilization Toggle: Allows you to easily activate or deactivate stabilization, providing flexibility during the editing process.
Additional Features:
- Camera Lock: Mimics a tripod effect, stabilizing the footage to appear as if it was shot on a stationary device.
- Zoom: Eliminates black bars that may appear post-stabilization, ensuring a cleaner final product.
- Cropping Ratio: Allows you to control how much the footage is cropped during stabilization to help prevent the black bars.
- Smooth: Adjusts the smoothness of movements in the stabilized video, providing a more natural look.
- Strength: Controls the intensity of the stabilization effect, allowing you to fine-tune the end result.
Understanding these features will help you produce a better final product in DaVinci Resolve.
How to Stabilize Video in DaVinci Resolve?
The best way to stabilize video is to avoid shaky conditions pre-shoot. If you can't do that we can apply stabilization effects in DaVinci Resolve using the Edit page or the Color page.
1. Preparing for Stabilization: Pre-shoot
Before hitting the record button, it's important to prepare for the stabilization process to optimize your final output.
Shooting at higher resolutions and frame rates can make it easier to stabilize shaky footage later by allowing for more data points to be analyzed during stabilization.
Understanding the different modes outlined earlier in the article, including tilt analysis and camera lock features, allows you to make informed decisions while filming.
2. Preparing for Stabilization: Post-shoot
Once you've captured your footage, the next step is to prepare it for stabilization in DaVinci Resolve.
First, review your clips to identify shaky video segments that could benefit from stabilization.
Prioritize clips that are essential to your narrative and consider the aesthetics of each shot. This preparation ensures that you can more effectively stabilize footage in DaVinci Resolve, enhancing the overall quality of your project.
3. Stabilization in DaVinci Resolve Using the Edit Page
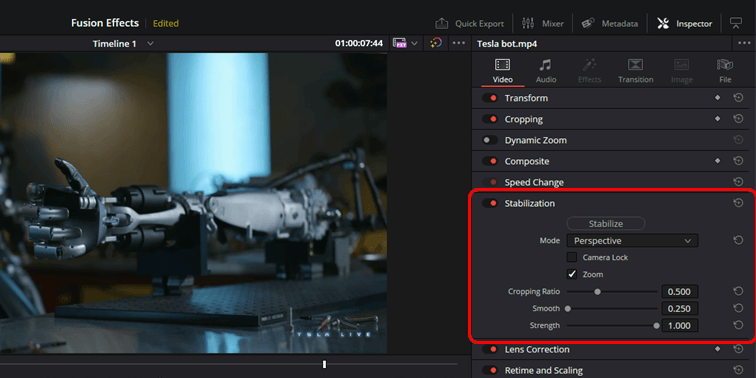
To add Stabilization on the Edit page, select your clip in the timeline that needs stabilization and head to the Inspector window.
Make sure the red Stabilization toggle is on so you can make changes.
Select Perspective, Similarity, or Translation based on your needs.
Adjust the Cropping Ratio, Smooth, and Strength settings as needed.
Click the Stabilize button.
Iterate as needed, remember to reference the "Stabilization Features You Should Know About" section of this article if you're unsure on any of the settings.
- Benefit: The Edit Tab in DaVinci Resolve is straightforward and intuitive, and most users are already familiar with working in the Inspector panel.
- Drawback: While the Edit Tab is great for basic stabilization tasks, it lacks some of the advanced controls and fine-tuning options available in the Color Tab.
4. Stabilization in DaVinci Resolve Using the Color Page
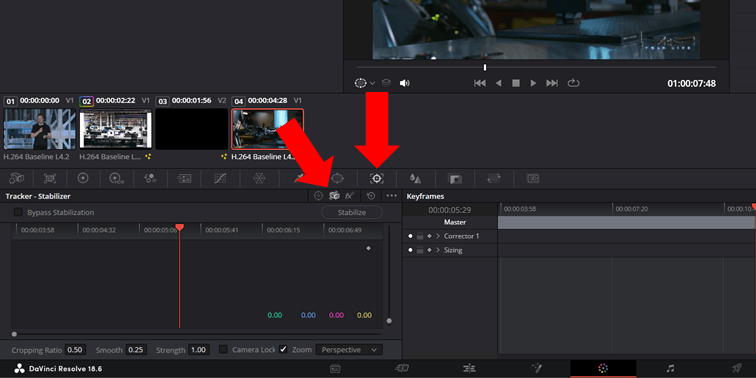
To add Stabilization on the Color page first make sure your playhead is over the clip you want to work on in the Edit page.
Head over to the color page and click the Tracker icon on the Colors Toolbar. Hover your mouse over the icons to find the Tracker icon, it looks like a target icon.
Now in the tracker display click the Stabilizer icon, it looks like a small camera with shaky lines around it.
You can now adjust your settings similar to the ones seen in the Inspector panel.
Click Stabilize!
- Benefit: Some editors prefer using the Color page to stabilize footage in DaVinci Resolve as it allows for color grading and stabilization simultaneously.
- Drawback: Stabilization in the Color tab isn't as simple as just using the Inspector panel.
Common Stabilization Pitfalls and How to Avoid Them
While DaVinci Resolve's stabilization modes are quite powerful, it's important to know about common pitfalls you as a video editor might face.
- Over-Stabilization: Applying too much stabilization can make the footage appear unnatural or "jello-like,". Be careful not to overdo it.
- Low Light: Stabilizing footage shot in low-light conditions can result in jittery or grainy outcomes, as the software struggles to accurately track movement. Take care in pre-production to avoid low light.
- High Noise: Stabilizing noisy or grainy footage can exacerbate the noise, making it more noticeable and distracting. Again, take care in pre-production to avoid poor footage.
- Lens Flares: Stabilizing footage with lens flares can cause the flares to jump around unnaturally.
- Rolling Shutter: Failing to account for the rolling shutter effect can lead to wobbly or skewed stabilization results, especially in fast-moving scenes.
- Inadequate Cropping: Insufficient cropping after stabilization can leave black bars or edges in the frame.
- Mismatched Modes: Using the wrong stabilization mode for the type of camera movement can result in ineffective or overly aggressive stabilization.
- Lack of Testing: Test your work and review your stabilized footage! Don't just rely on DaVinci Resolve to perfectly fix your shaky video. You can even try watching the footage in reverse to be extra thorough.
Final Thoughts
So there you have it folks, how to stabilize your shaky videos in DaVinci Resolve.
You can use the Color tab or the Edit tab. It's really up to you! At the end of the day they have the same functionality, they're just packaged slightly differently.
After reading this guide you should never have to worry about shaky footage ever again!
If you’re still looking to learn more consider taking a course on DaVinci Resolve.

Anthony Gallo
Anthony Gallo is the cofounder of ContentCreator.com and lead educator in the online course 14 Day Filmmaker, that has taught over 100,000 aspiring creators how to shoot & edit professional video content with PRO and SMARTPHONE cameras.
Having created content in a variety of industries including commercial advertising, weddings, music videos, and hundreds of youtube videos, Anthony has amassed over 50 million views online and is constantly looking for new and engaging ways to create content and help others master this amazing craft.