How to Reverse a Clip in DaVinci Resolve
Last UpdatedOctober 19, 2023
by
Anthony Gallo

Over the many years I've spent editing videos in DaVinci Resolve, there have been countless times where I've needed to reverse clips to achieve the exact look or effect I needed.
You might be surprised how often you'll need to know how to reverse a clip in DaVinci Resolve.
In this guide, I'll show you 3 easy methods you can use to reverse your video clip in DaVinci Resolve. I’ll also compare the pros and cons for each method.
How to Reverse a Clip in DaVinci Resolve?
There are 3 ways to reverse videos and clips in DaVinci Resolve:
- Using the "Change Clip Speed" option
- Using Retime Controls
- Using the Inspector tool
Let's take a closer look.
Method 1: Using Change Clip Speed
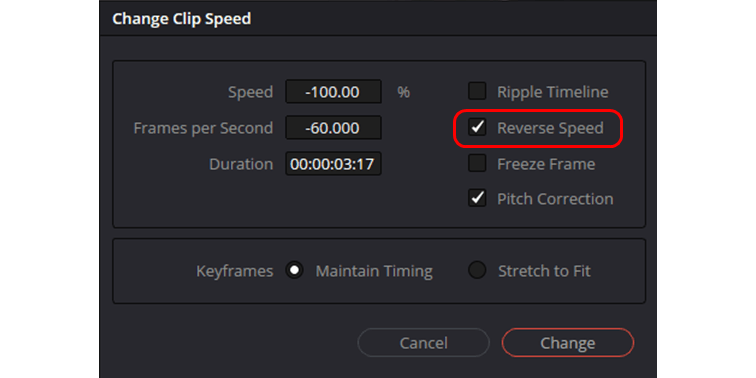
The easiest method can be done by right-clicking on your video clip and selecting "Change Clip Speed" from the drop-down menu. A dialogue box will appear, presenting you with a few options for altering the speed of the clip. To enable the reverse effect, just tick the box next to "Reverse Speed."
- Benefit: This method is straightforward and quick, making it ideal for beginners or those looking for a fast solution.
- Drawback: It offers fewer customization options for a reversed clip compared to methods 2 and 3.
Method 2: Using Retime Controls
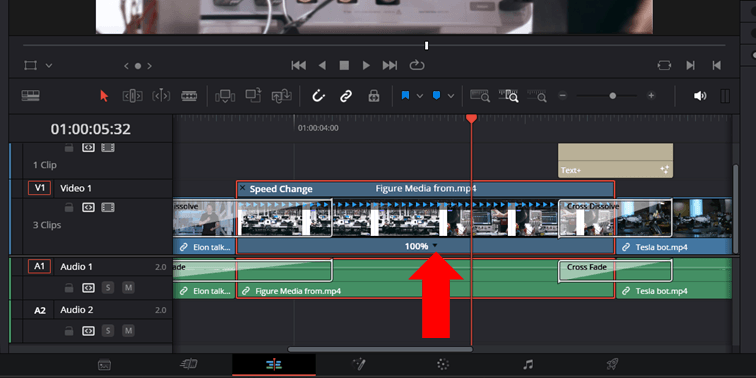
The second method to reverse videos in DaVinci Resolve is, right-click on the video clip you wish to reverse and choose "Retime Controls" from the menu. A row of blue arrows pointing will then appear above your clip. Click on the arrow pointing down at the bottom of the clip next to the "100%" text, click "Reverse Segment" from the list that appears.
- Benefit: Retime Controls allow for more nuanced adjustments, giving you the ability to fine-tune the reverse effect.
- Drawback: The method can be a bit complex for those who are new to DaVinci Resolve, requiring a few more steps.
Method 3: Using Inspector Tool
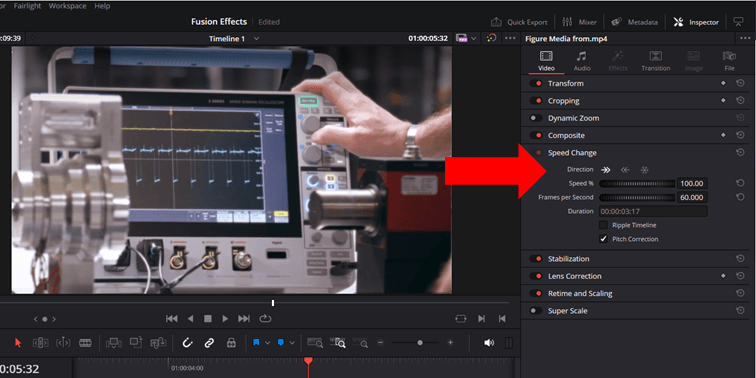
To use the third method, head to the "Edit" page and locate the "Inspector" button in the upper right corner. Click on it to open the panel. Once there, navigate to the "Video" tab and find the "Speed Change" section. Expand it and then click on the leftward-pointing arrow to initiate the reverse effect on your video.
You can also add slow motion and other change speed effects in the Inspector Video menu.
- Benefit: The Inspector tool provides a comprehensive set of options for reversing a clip, including the ability to reverse only the video while keeping the audio intact.
- Drawback: The multitude of options can be overwhelming for beginners, and it may take longer to navigate through the settings and other editing tools.
What is the Best Method for Reversing a Video Clip in DaVinci Resolve?
The best method for reversing a clip in DaVinci Resolve largely depends on your specific needs and level of expertise.
- For Beginners: If you're new to DaVinci Resolve or need a quick solution, using the "Change Clip Speed" method is your best bet.
- For Intermediate Users: If you have some experience and are looking for more control over the reverse effect, the "Retime Controls" method offers a good balance of simplicity and customization.
- For Advanced Users: If you're well-versed in DaVinci Resolve and want the most control over your reverse effect, the "Inspector Tool" method provides the most comprehensive set of footage layer options.
Pro Tips for Reversing Clips
- If you want to reverse the video without affecting the audio, right-click the video clip and uncheck the "Link Clips" option in the pop up menu before applying the reverse speed.
- Experiment with different frame rates to achieve varying effects when you change the clip speed. This can be done in the Inspector panel or the Change Clip Speed pop up window.
- Try using the "Freeze Frame" setting available in Retime Controls to freeze a specific frame and extend it for a duration of seconds.
- Use the speed change option to add slow motion to the above steps.
- If you really want to get serious, look into taking a training course on DaVinci Resolve.
Why Reverse a Clip?
Reversing a video clip is a great editing tool that is often used for special video editing effects and advanced transitions in DaVinci Resolve. It can be used to create suspense, emphasize a point, or even add a comedic element to your video.
Whether you're creating a corporate video, a short film, or a social media post, the ability to reverse clips on your timeline can serve various purposes and similar to my last article on timeline zooming, it’s an essential skill to learn in DaVinci Resolve.
Alternative Software for Reversing Clips
While DaVinci Resolve is a more than capable tool for reversing clips, there are alternative software options like Adobe Premiere Pro and Final Cut Pro that offer similar functionalities.
You can also try an online reverse video tool like EzGif if you don't have access to video editing software.
Conclusion
In this step by step guide we learned the 3 best video editing methods to reverse speed in DaVinci Resolve.
Reversing a clip in DaVinci Resolve is a straightforward yet useful technique that I often find myself using to add unique visual effects, transitions, and stabilizations.
Whether you choose to change the clip speed, use Retime controls, or the Inspector panel, each method offers its own benefits and drawbacks.
Try them out next time you're looking to reverse segment or speed change in DaVinci. Which one did you pick?

Anthony Gallo
Anthony Gallo is the cofounder of ContentCreator.com and lead educator in the online course 14 Day Filmmaker, that has taught over 100,000 aspiring creators how to shoot & edit professional video content with PRO and SMARTPHONE cameras.
Having created content in a variety of industries including commercial advertising, weddings, music videos, and hundreds of youtube videos, Anthony has amassed over 50 million views online and is constantly looking for new and engaging ways to create content and help others master this amazing craft.