How to Add Transitions in CapCut: Step-by-Step Guide
Last UpdatedFebruary 12, 2024
by
Anthony Gallo

Adding transitions in CapCut videos is one of the easiest ways to make your content look like it was made by a professional editor.
In this guide, I'll outline exactly how to add transitions in CapCut, how to make smooth transitions in CapCut, how to add text transitions in CapCut, and more!
Let this be your ultimate CapCut transitions guide. Let's go! 👇
How to Find Transitions in CapCut
The free transitions and templates that come with CapCut are pretty great!
The good news is, finding transition effects in CapCut is super simple and intuitive so it'll be easy to remember.
Find Transitions Using the Mobile App
If you're video editing in the CapCut mobile app, to easily find transition effects simply click the white icon between any 2 video clips to show the transitions menu.
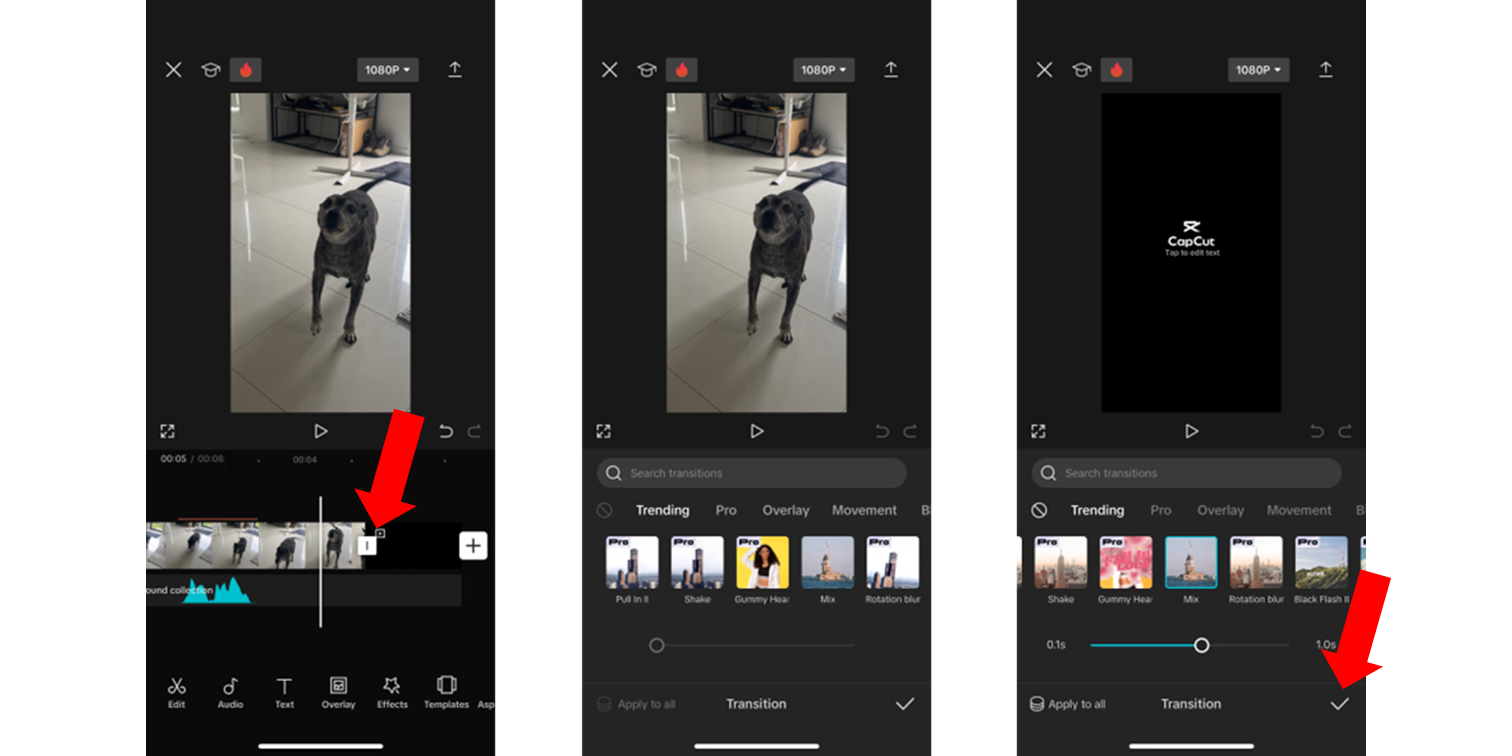
From here, you can search by typing the name of your favorite transition effects, or simply scrolling through the massive transition library.
Find Transitions Using PC
To find transitions when using the CapCut desktop app, check out the media panel in the top right of the screen.
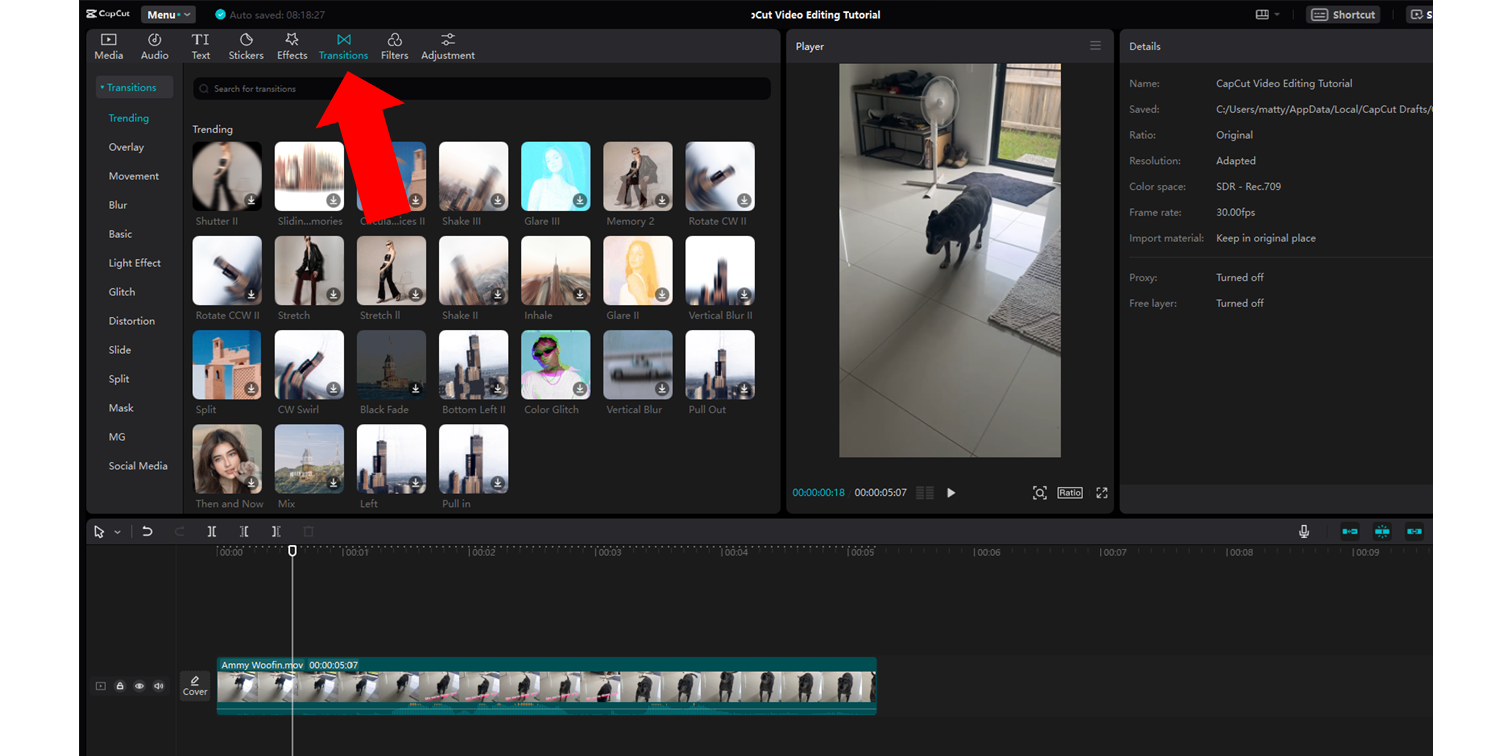
Here, you'll be able to access transitions, audio, text, filters and many more CapCut features and settings.
How to Add Transitions in CapCut
Once you're familiar with the location of transition effects in CapCut, it's time to start adding transitions to your video clips.
Add Transitions Using the Mobile App
Once you've found the transitions you want to add using the mobile app, simply tap the transition.
CapCut will show a preview and you can use the slider to change the duration of the transition.
Once you're happy with how it looks you can also choose to apply the transition to all clips.
Click the tick symbol in the bottom right hand side to apply the transition and finish up.
Add Transitions Using PC
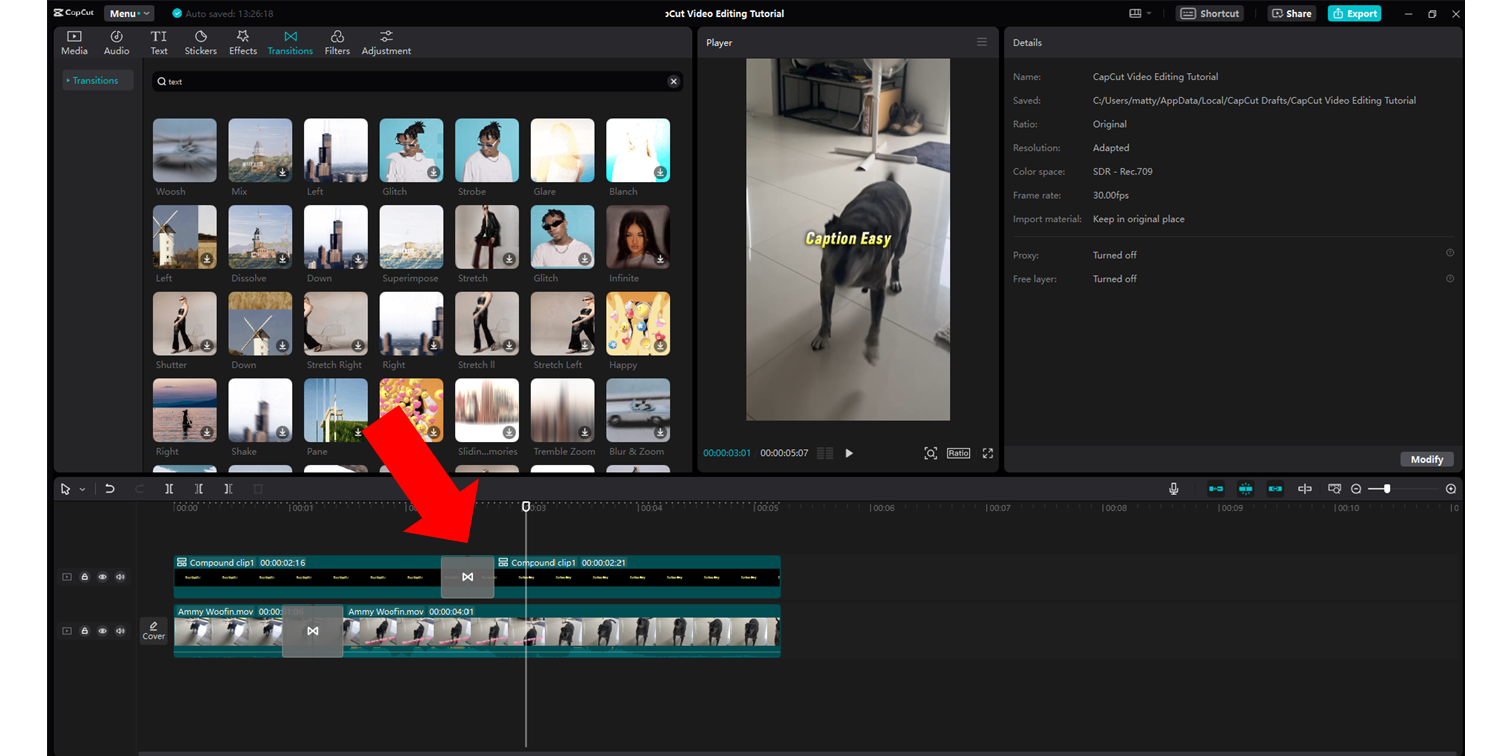
From the transition menu on desktop, identify the video transitions you want to add.
Once this is done, to add a transition simply drag and drop the asset between two clips.
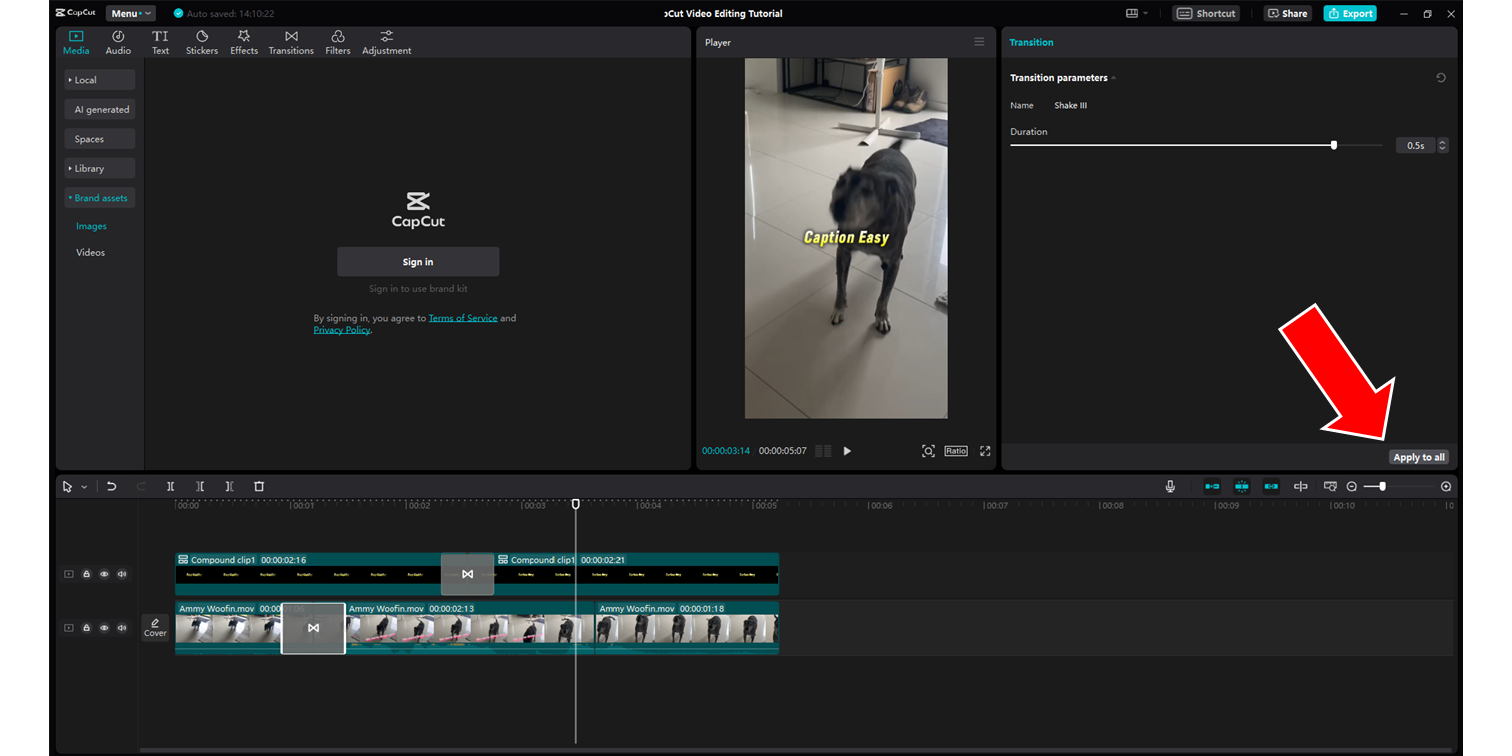
You can adjust the duration using the slider in the top right panel, or by click the edge of the transition icon on the timeline.
If you want to add a transition effect within a single clip, use CTRL/CMD + B to cut the clip into 2 sections. This will allow you to add visual effects to the middle of clips, not just the start and end.
How to Add Text Transition Effects in CapCut
Adding text transition effects in CapCut only requires a few more steps than what we've covered so far.
To add a transition effect to your text captions in CapCut, create your custom captions by adding default text to your project or using the auto-caption tool.
Apply any styles you want to your text, then highlight your clips and click "Create compound clip", this allows you to add video transitions.
Before adding video transitions, use the cut tool to split your compound clip at the points your text changes.
Congrats, you just added a new video editing trick to your bag of CapCut video editing skills!
How to Make Smooth Transitions in CapCut
To apply smooth transition effects in CapCut video editing tool, simply locate the search bar on mobile or PC, search for "smooth" and choose from the massive range of free smooth transition effects provided on the CapCut app.
How to Apply Transitions to All Clips in CapCut
To apply a transition to all clips in the CapCut mobile app simply click the "Apply to all" checkbox at the bottom of the screen when selecting your transition.
On desktop, click the transition you would like to apply to all your cuts, and click the "Apply to all" button located in the middle right hand side of the screen, just above the timeline.
Understand When NOT to Use Transitions in CapCut
An equally important aspect of professional video editing is recognizing when transitions are unnecessary.
Overusing transitions, especially flashy or elaborate ones, can quickly overwhelm your content, distract your audience, and give your work an amateurish feel.
This rookie mistake is common among beginners excited by the range of options CapCut offers.
What most video editors learn over time is that the mark of a seasoned professional is not just in how well they can apply transitions but also in their restraint.
Sometimes, a simple cut is the most effective way to move from one scene to the next, keeping the viewer’s attention focused on the content rather than the effect.
Learning when to let the content speak for itself without the distraction of a flashy transition will actually better engage your audience.
Tips When Working with Transition Effects in CapCut
Here is a list a bulletproof tips for beginner editors using CapCut to add seamless transitions to their content:
- Plan Your Transitions: Before diving into your video editing process, visualize the story you want to tell. A seamless transition complements the narrative by ensuring a smooth flow between scenes. Not every transition fits every moment, so planning ahead can save time and enhance storytelling.
- Experiment with Various Transitions: CapCut offers a wide variety of transition options, from simple fades and cuts to more elaborate 3D effects. Spend time experimenting with these various transitions to understand how they impact your video's narrative and aesthetic. Finding the right balance can transform a good video into a great one.
- Match Transitions to Your Video’s Mood: The transition effects you choose should align with the mood and tempo of your video. Fast-paced, dynamic transitions may suit upbeat, energetic content, while smoother, slower transitions might be better for more solemn or narrative-driven pieces. The transition should enhance, not distract from, your video’s message.
- Use Compound Clips for Complex Transitions: For more complex edits, especially when applying transitions between text and video clips, use the ‘Create compound clip’ feature. This ensures a seamless integration of text and video, allowing for smooth transitions that maintain the viewer’s focus on your content.
- Maintain Consistency: While it might be tempting to use many different transitions to showcase your skills, consistency often leads to a more professional-looking video. Selecting a few transition types and sticking with them throughout the video can help maintain a cohesive visual experience for your audience.
- Shorter is Often Better: When deciding on the duration of your transitions, remember that shorter transitions usually maintain a better pace and keep the audience engaged. While there are exceptions, especially for stylistic or dramatic purposes, transitions that are too long can disrupt the flow of the video.
- Preview Transitions: Always preview your transitions in context with the entire video. Something that looks great in isolation may not work as well when viewed as part of the whole. CapCut’s preview feature makes it easy to check how your chosen transitions blend with the overall video before finalizing them.
- Refine Transitions with Keyframes: For advanced users, adding keyframes in CapCut can provide precise control over the transition effects, allowing you to fine-tune how and when they occur. This is particularly useful for creating custom, smooth transitions that perfectly suit your video's pacing and style.
- Seek Inspiration: Finally, don’t hesitate to look at other videos for inspiration. Many creators use CapCut and share their projects online. Evaluating their transition choices can provide new ideas and insights for your own video projects.
Remember, the goal of using transitions is to enhance your video’s storytelling by ensuring a smooth flow between scenes or ideas. With practice and experimentation, you’ll find the right combinations of transitions to elevate your video editing projects to the next level.
Don’t forget to remove the watermark from your CapCut exports!
Wrapping Up
Wrapping up, mastering seamless transitions in CapCut enables you to elevate your videos to a professional level.
Whether you're starting a new project or refining current content, understanding how to apply smooth transitions is key.
Experiment, remain consistent, and allow your story to guide your use of transitions. This approach will captivate your audience and showcase your video editor skills. Happy editing! 😎

Anthony Gallo
Anthony Gallo is the cofounder of ContentCreator.com and lead educator in the online course 14 Day Filmmaker, that has taught over 100,000 aspiring creators how to shoot & edit professional video content with PRO and SMARTPHONE cameras.
Having created content in a variety of industries including commercial advertising, weddings, music videos, and hundreds of youtube videos, Anthony has amassed over 50 million views online and is constantly looking for new and engaging ways to create content and help others master this amazing craft.