CapCut Video Editing Tutorial: From Beginner to Advanced
Last UpdatedFebruary 4, 2024
by
Anthony Gallo
CapCut is a free video editing app that allows you to create and edit videos in an incredibly intuitive and user-friendly environment.
In this guide, I'll show you the basic editing tools to get started in CapCut, we'll then look at a beginner CapCut video editing tutorial, followed by advanced techniques ensuring your next video has the best chance of connecting and going mega viral!
Let's do it. 👇
Getting to Know the CapCut Layout
CapCut is one of the most user-friendly and intuitive video editing platforms I have come across.
With that being said, if you've never used video editing software before following a guide like this can accelerate your progress as a total beginner.
In this section I'll outline the main tabs in CapCut so you know exactly where to find what you need.
Media Tab
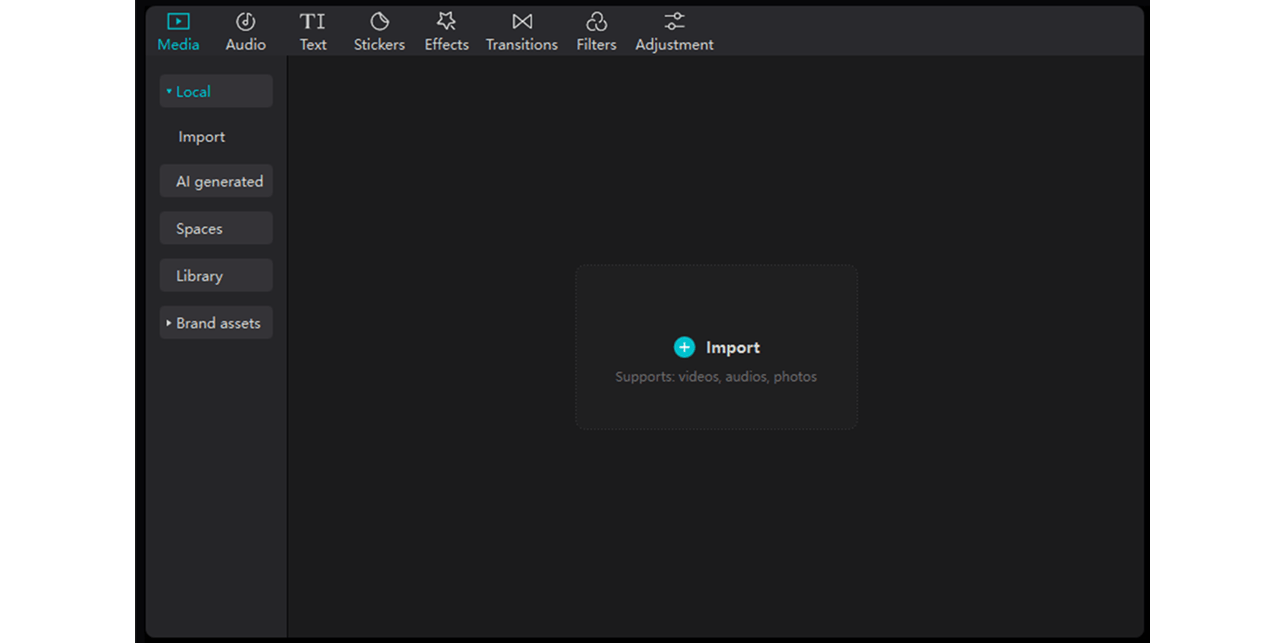
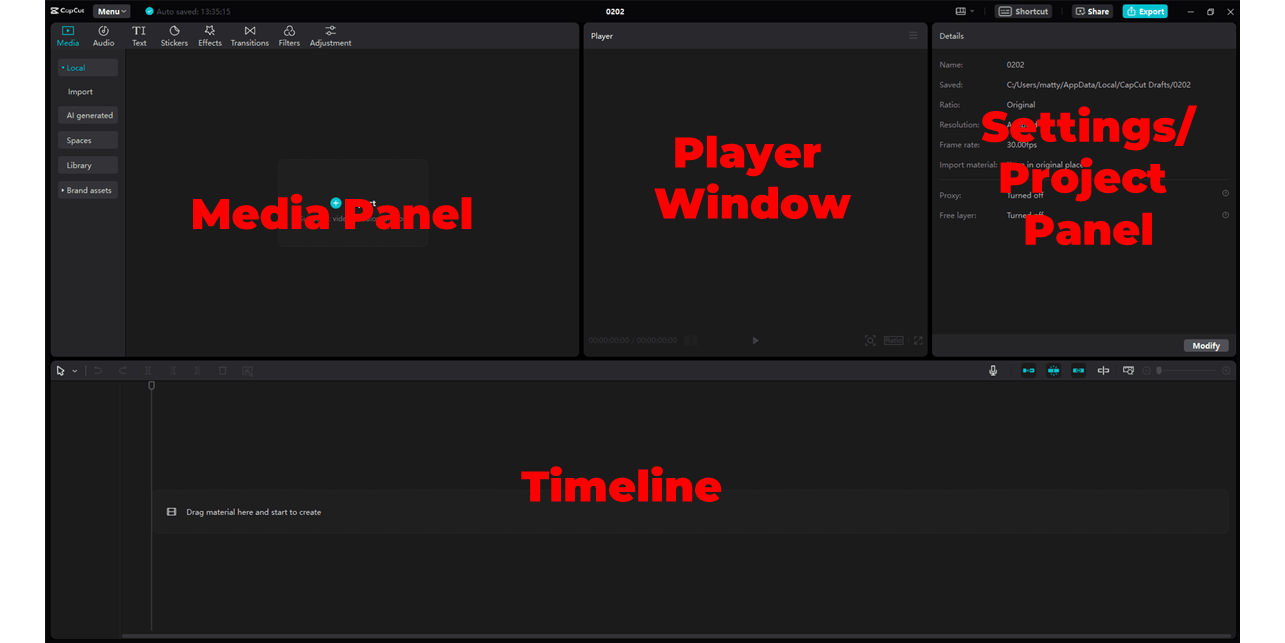
In the top left hand corner of the CapCut Graphical User Interface (GUI) is the Media Tab.
The media tab in CapCut is where you'll import videos, images, and audio files. Alongside the media tab, there are 7 other tabs outlined below:
- Audio: The Audio tab is a specialized section in the CapCut app where you can explore and add various sound effects and background music clips from CapCut's library of free audio assets.
- Text: In the Text tab, you'll be able to access a wide range of fonts and styles to add words or captions to your video clip.
- Stickers: The Stickers tab offers a fun collection of animated and static trending images that can be overlayed onto video clips and TikTok videos, adding extra depth to your content.
- Effects: Through the Effects tab in the CapCut app, you can create dynamic visual modifications, from glitches to cinema-quality animations.
- Transitions: The Transitions tab in the CapCut app provides an array of completely free seamless transition effects that help in smoothly connecting different video clips.
- Filters: The Filters tab allows you to dramatically change the mood and aesthetic of your video clips by applying various color grading and effect filters available within CapCut's editing tools.
- Adjustment: Lastly, the Adjustment tab is where you can import video presets and LUTs into CapCut for color grading or just to add some extra visual flare to make incredible videos.
Timeline
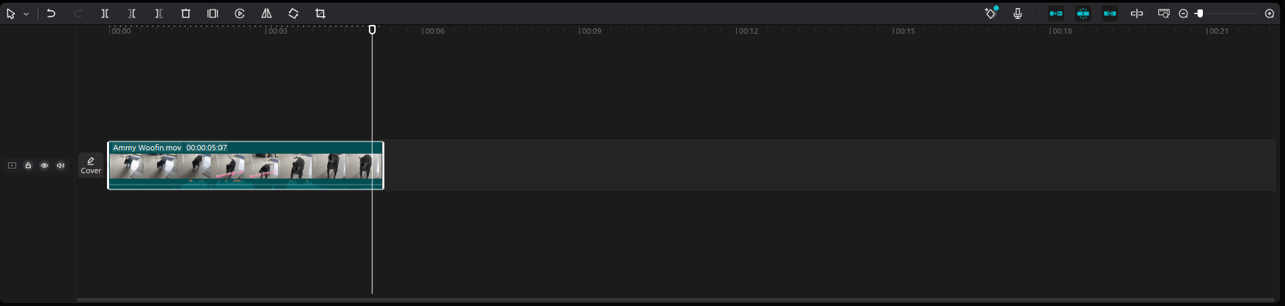
Now you've used the media panel to import videos into CapCut, let's take a look at the timeline.
The timeline is where you'll assemble and arrange all your footage and audio clips. To get started, drag and drop your clips and audio files from the media pool to the timeline.
Pro Tip: Click your files while they're still in the media pool, you'll see a box appear around the media which allows you to trim the media before bringing it to your timeline - very handy for longer files.
To timeline zoom in CapCut you can:
- Use the slider bar in the upper right corner of the timeline panel
- Hold CMD/Control + or - keys
- Hold CMD/Control and use your mouse scroll wheel (my personal favorite for zooming)
To trim videos in CapCut:
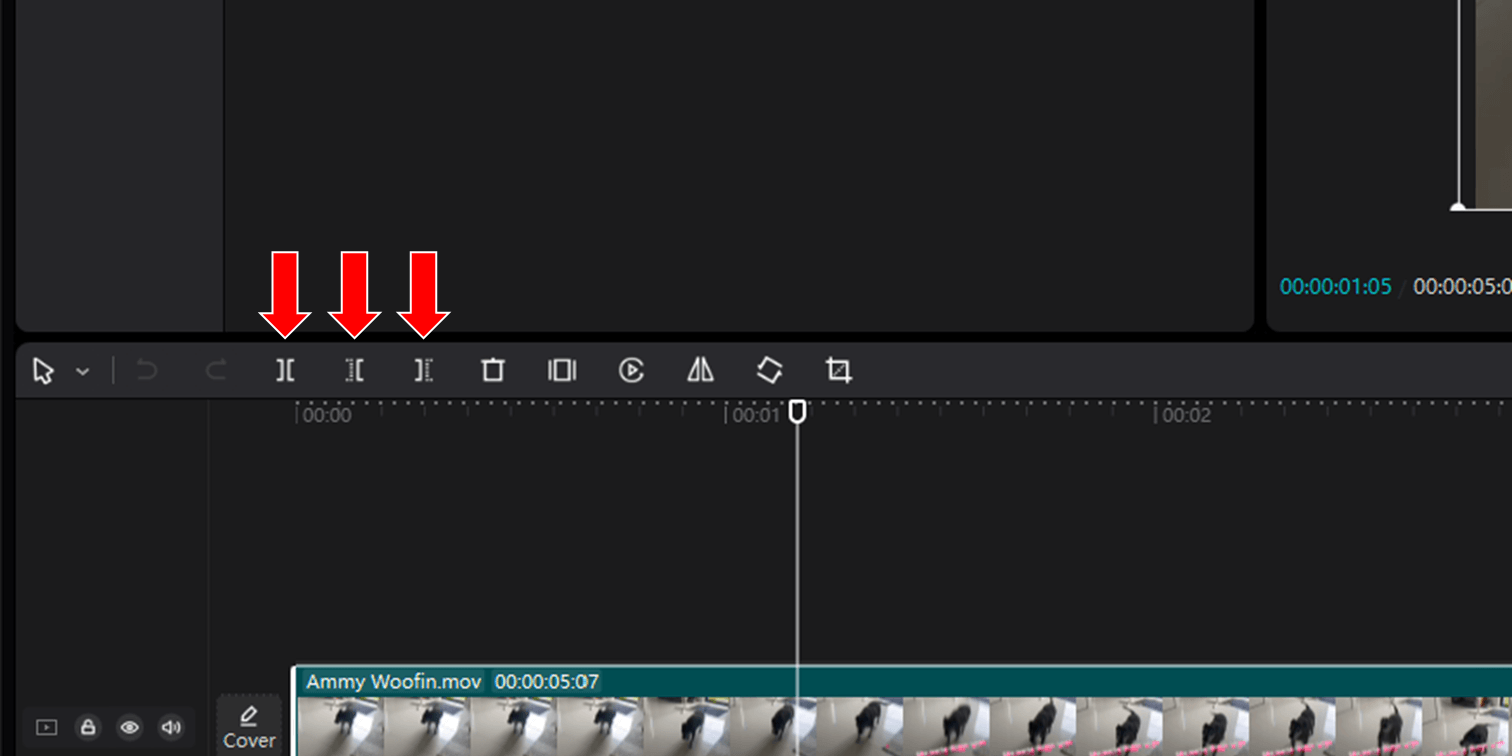
- Split: Move the playhead to where you want to cut and click the "Split" button in the upper left hand side of the timeline panel, OR simply press CMD/Ctrl+B on your keyboard.
- Delete Left: Move your playhead to your desired cut point and click "Delete Left" or simply press Q on your keyboard. This feature will delete all media to the left of your playhead.
- Delete Right: Move your playhead to your desired cut point and click "Delete Right" or simply press W on your keyboard. This feature will delete all media to the right of your playhead.
To Undo in CapCut use CMD/Ctrl + Z
To Redo in CapCut use CMD/Ctrl + Shift + Z
Don't forget to remove the watermarks in CapCut too, which can be done via trimming the timeline.
That just about covers the basics regarding the CapCut timeline, there's a few additional advanced features which we'll cover later in the advanced section.
Settings Panel
The settings panel, located in the top right of the CapCut GUI gives you a range of settings allowing you to adjust the size and scale, audio, speed, coloring and more of your video clip.
Click an item on the timeline to see the settings for that specific clip.
Here's a brief rundown of what you can do in each tab:
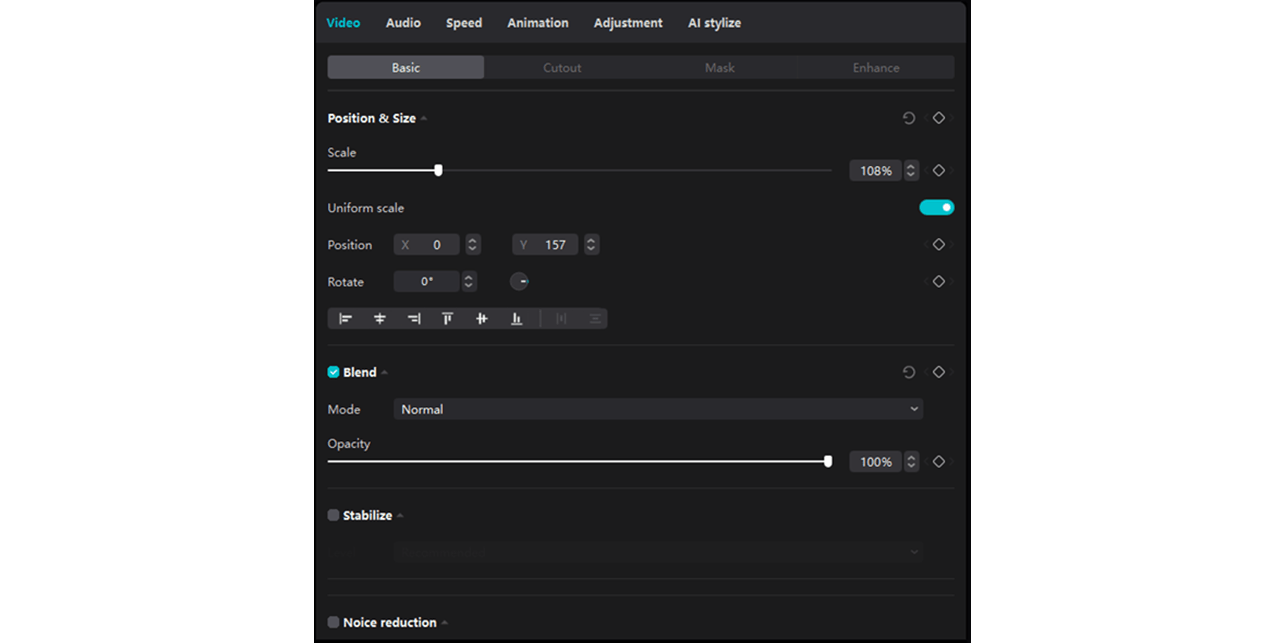
- Video: In the video tab, you can edit videos by altering their position, size, blend mode, opacity, and stabilize footage to add a professional touch to your video clip. You can also do green screening and auto cutouts here too.
- Audio: The audio section allows you to adjust audio clip, including the volume of your video clips or background music, fade ins/outs for smoother transitions, loudness normalization for consistent audio levels, and noise reduction to enhance the clarity of your audio clip.
- Speed: With the speed feature, you have the flexibility to speed up or slow down your video clips, adding dynamic video effects to your YouTube videos.
- Animation: The animation tab in CapCut video editing introduces animations, acting as transitions for single clips, where you can select in, out, or combo animations for engaging video effects.
- Adjustment: the adjustment tab serves as your color panel, letting you fine-tune the temperature, hue, saturation, brightness, etc., of your video clip, ensuring your video tutorial or any video project looks exactly how you envisioned.
Project Panel
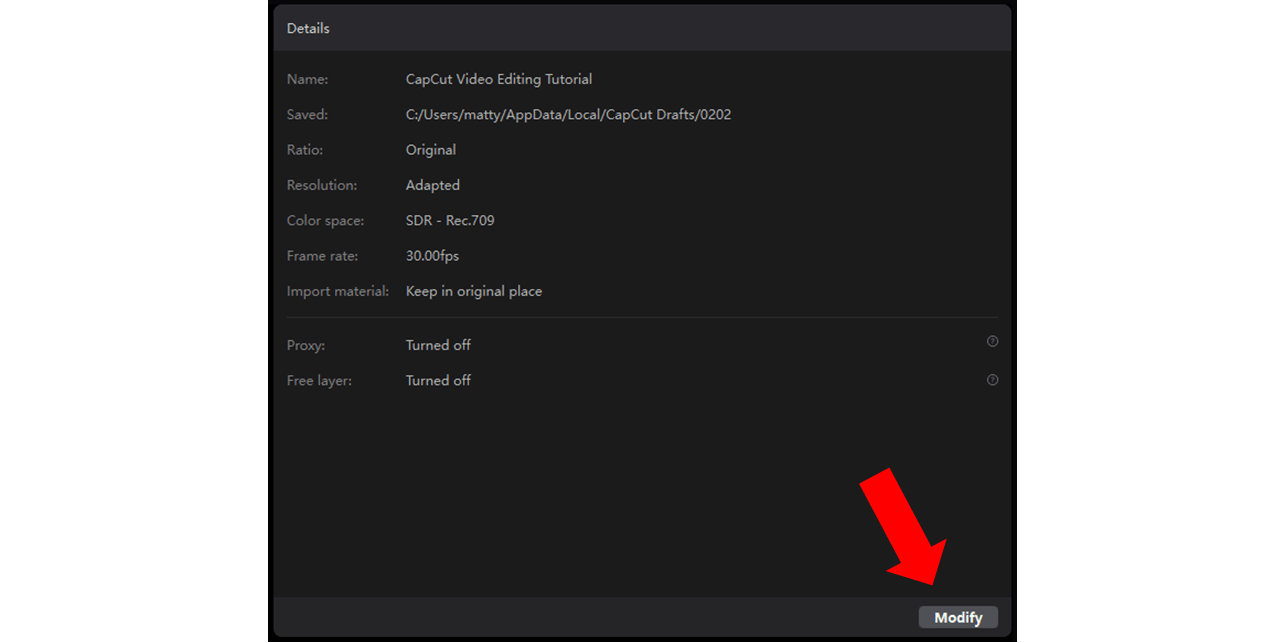
The CapCut video project panel will show in place of the settings panel when no items on the timeline are selected.
Click the modify button in the bottom right of the project panel to modify the name, location, aspect ratio, resolution, frame rate, and color space of your project!
Player Window
The player window is fairly self explanatory but features a few useful settings worth talking about:
- Aspect Ratio: Set the aspect ratio for your video clip. You'll want 16:9 for YouTube videos and usually 9:16 for Reels, TikTok videos, and YouTube shorts.
- Preview Quality: In the top right of the Player window you'll see a 3 line hamburger icon, click this to modify the preview quality. Especially useful if you're experiencing poor playback performance.
- Export Still Frame: Useful feature when looking to export stills of your video content without having to fiddle around with a screen snip.
If you're using multiple monitors you can also undock the player panel by clicking and dragging the top bar.
How to Edit a Beginner Video in CapCut
Now that we're familiar with the CapCut layout, let's take a look at a beginner CapCut video editing tutorial.
In this section, I'll outline the basic steps to edit a talking head style video, add b-roll, add transitions, generate and edit captions, and how to add background music.
1. Cut & Trim Clips
When recording your talking head video, it's much easier and quicker to bullet point your script and narrate your videos in segments. This way, you don't have to memorize an entire script
The drawback in recording this way is that you will end up with a lot of dead space in your recording, so the first step is to clean up and cut out this dead space.
CapCut features some super handy keyboard shortcuts for this task:
- Split: Move the playhead to where you want to cut and click the "Split" button in the upper left hand side of the timeline panel, OR simply press CMD/Ctrl+B on your keyboard.
- Delete Left: Move your playhead to your desired cut point and click "Delete Left" or simply press Q on your keyboard. This feature will delete all media to the left of your playhead.
- Delete Right: Move your playhead to your desired cut point and click "Delete Right" or simply press W on your keyboard. This feature will delete all media to the right of your playhead.
For efficiency, I recommend using keyboard shortcuts for these functions. These procedures can help make your video more concise and watchable.
2. Adding B-Roll
Next, you'll want to add b-roll to your video.
B-roll refers to additional clips that supplement the main video footage (or the A-roll). Adding b-roll makes your video more dynamic and keeps your viewers interested. It just makes your overall product look more professional too.
You can either film your own b-roll relevant to your content, or you can use sites likePexels to download free b-roll and add it to your content.
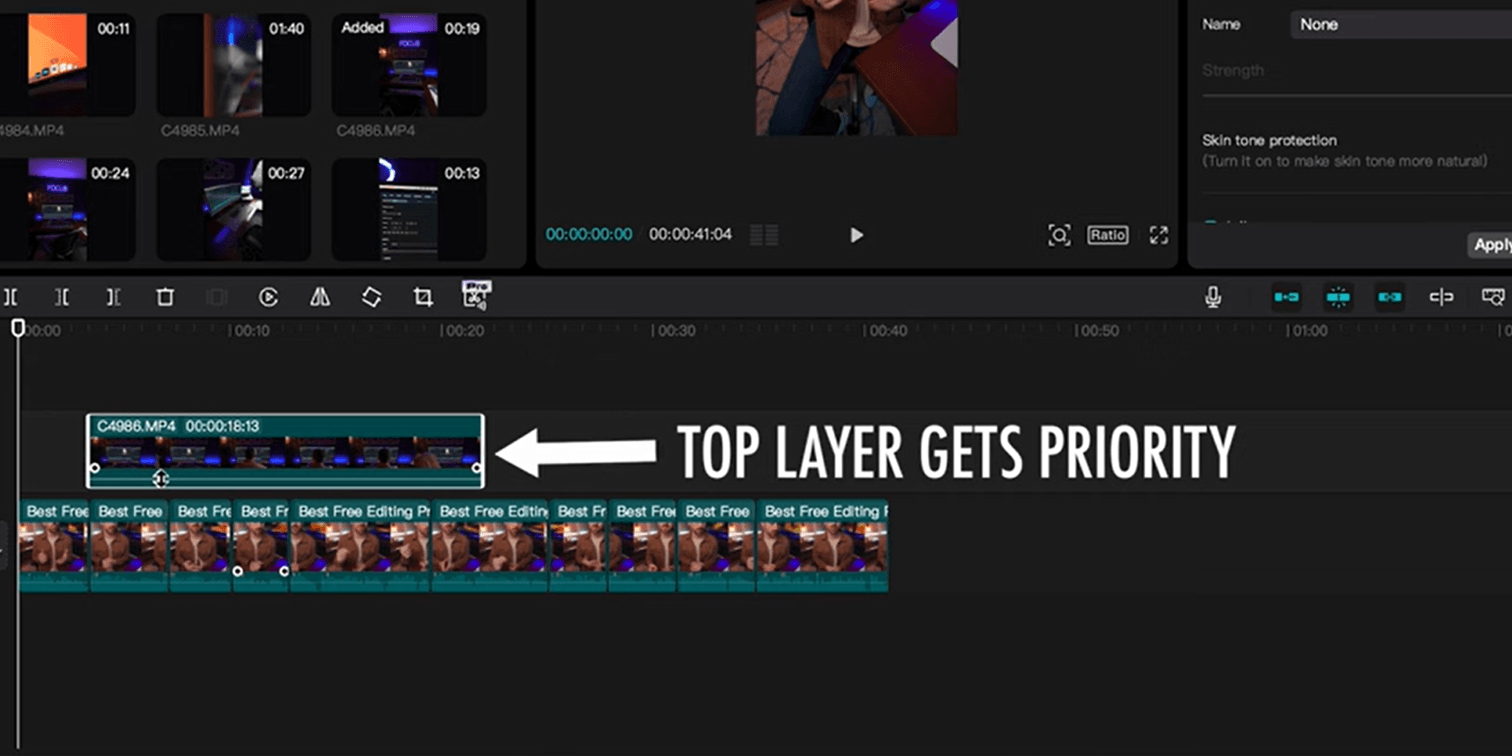
To add b-roll, drag and drop the desired b-roll clip onto a new layer in CapCut. Remember, top layers get priority playback, meaning that the top clips will be layered over the top of any clips below them in payback. So layer your clips accordingly!
Timing your b-roll to start or finish in-line with your cuts from section one is a great way to improve the flow of your clips and reduce choppiness.
3. Transitions & Effects
Adding transitions and effects can elevate your video to the next level but use them wisely! A classic beginner mistake I see quite often is the overuse of video transitions.
Adding transitions to your CapCut videos is super simple: Just click the Transitions button in the top left, search and select your desired transition, then drag and drop it onto your timeline between 2 clips.
Ensure your clips are on the same layer to add transitions.
My personal favorite transitions right now, which are popular amongst many creators are the Glare Transition, the Pull In, and Pull Out style transitions.
4. Auto Captions
Auto Captions in CapCut offer a fantastic way to make your videos more accessible and engaging.
To add Auto-Captions in CapCut click the Text button in the Media Tab and then the Auto Captions button.
You can easily change the font size, style, and other classic text editing features by selecting a caption block on the timeline and clicking on "basic" in the top right (Settings Panel).
Remember to check on "Apply to All" if you want your changes to apply to all the captions across your video.
Applying styles like stroke to increase the letter border width, rounding corners, or adding a drop shadow can significantly enhance the aesthetics of your captions.
Use the split tool to manually adjust caption segments, the currently trend is to only have a few words on the screen at a time. CapCut does this well automatically but you might need to change a few captions that get a bit long here and there.
Adding animations like Zoom in can add dynamism to your captions. Simply select the text layer, head into the animation sub tab in the text menu, and choose your desired animation.
Learn more about captions and CapCut's text-to-speech features.
5. Adding Music
Music can set the mood of your video and it's incredible how much impact choosing the right music can have on engagement and virality of your content.
You can use the built-in songs available in TikTok or Instagram, or import songs from external sources like Epidemic Sound, which has quality and diverse music options.
When adding music, adjust the volume (usually around -16DB) to ensure it doesn't overpower the other audio in your video.
Adding the right music track to your edit is one of the best band-for-buck things you can do!
6. Exporting
After completing all edits, export your finished video. You can title your video and choose where you want it to be exported by clicking away from any clips and making changes in the Project Panel.
Once everything is checked, click export and your video is ready to be posted online.
Learn more CapCut video editing tips to level up your content creation process!
Advanced Editing in CapCut: Create a Striking Intro
One of the most important things to get right when editing and releasing short form content in the intro.
In this advanced guide, learn how to animate and create advanced captions using keyframes, zoom and add dynamic effects to your video clips, and use the auto-cutout feature alongside a crumpled paper background to seriously level up your content! 📽️
Following this, I briefly touch on sound design, adding those finishing touches to make world classed short form content.
Wrapping Up
In this CapCut video editing tutorial we covered topics helping beginners edit videos and provided a taste of some advanced video editing techniques.
If you're brand new to CapCut use the first section of this article to familiarize yourself with the CapCut layout, then move on to the beginner tutorial.
If you're already familiar with CapCut and want to challenge yourself with some advanced video editing techniques, check out the YouTube video in the Advanced editing section to seriously level up your content!
Happy editing. 😎

Anthony Gallo
Anthony Gallo is the cofounder of ContentCreator.com and lead educator in the online course 14 Day Filmmaker, that has taught over 100,000 aspiring creators how to shoot & edit professional video content with PRO and SMARTPHONE cameras.
Having created content in a variety of industries including commercial advertising, weddings, music videos, and hundreds of youtube videos, Anthony has amassed over 50 million views online and is constantly looking for new and engaging ways to create content and help others master this amazing craft.