How to Import Fonts Into DaVinci Resolve
Last UpdatedOctober 9, 2023
by
Anthony Gallo
Importing custom fonts to DaVinci Resolve is one of the easiest ways to make your content stand out on YouTube.
If you're reading this article then chances are you want to use something other than what's provided in the DaVinci Resolve font library.
Well, you're in the right place!
In this article, I'll show you exactly how to import custom fonts to DaVinci Resolve. I'll also show you where to find some free fonts too!
How to Import Fonts Into DaVinci Resolve?
To import fonts into DaVinci simply download your desired .ttf or .otf font file, double click to install on your computer, and restart DaVinci Resolve to use your new font.
Whether it's Google fonts you want to use, or original title templates, the procedure is simple. Let's learn how to add fonts to DaVinci Resolve. 👇
Step 1: Download Your Desired Font

- Start by searching for the custom font you want to use in DaVinci Resolve. If you're looking for a wide variety of options, consider exploring Google fonts or check out the text assets available here on Content Creator Templates.
- Once you've found your desired font, download it and save to your computer. This will typically provide you with a zip file containing the font files.
- Unzip the downloaded file to access the font files. Inside, you'll typically find .ttf (TrueType Font) or .otf (OpenType Font) files, which are the files you'll need.
Step 2: Install the Font on Your Computer
For Windows users:
- Double-click on the font file (either .ttf or .otf).
- A pop-up window will appear, displaying the font in various sizes and styles. At the top, you'll see two buttons: 'Print' and 'Install'.
- Click on the 'Install' button. A dialog box will appear, indicating when the install is complete.
For Mac users:
- Double-click on the font file to open it in the Font Book application.
- Click on the 'Install Font' button. The font will then be added to your Font Book, where Mac users can manage their installed fonts.
Step 3: Restart DaVinci Resolve
- After installing your new fonts, it's essential to shut down DaVinci Resolve and then reopen it. This ensures that DaVinci Resolve recognizes and loads all the new fonts you've installed!
Step 4: Use Your Custom Font in DaVinci Resolve
Now that's done we're ready for the fun part: adding text to DaVinci Resolve.
- Open DaVinci Resolve and navigate to the edit page.
- In your project timeline, go to Effects > Toolbox > Titles, then drag and drop a text+ clip onto your timeline.
- With the inspector panel open, click on the font dropdown menu.
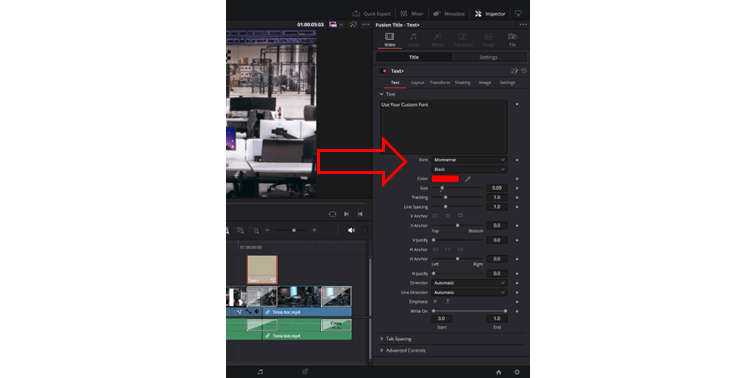
- Scroll through the list to find and select your newly installed custom font. Now you can utilize your chosen font for customized transitions, titles, captions, or any other text elements in your project.
By following these steps, you can add a touch of personalization to your DaVinci Resolve projects using custom fonts. Ensure you've checked the license agreements of the fonts you download!
FAQs
Where can I download free fonts for DaVinci Resolve?
Google Fonts is one of the most popular collections of free fonts that are optimized for web and print. All fonts available on Google Fonts are open-source and free to use for personal and commercial projects.
Are Google fonts free?
Google fonts are free to use. However, it's always good practice to check the license agreement associated with any font you download to ensure you have the right to use it for your intended purpose.
What are some popular fonts for social media?
Here are some popular custom fonts that have made a mark on social media:
- Montserrat: Made popular by Alex Hormozi with his unique Montserrat video captions.
- Badaboom BB: Popular amongst creators for its high impact and popularity with younger audiences.
- Impact: Simple block style letters that are a popular choice for YouTube thumbnails.
- Config Rounded: Professional font popular with tech creators.
- Special Elite: Popular font for adding a typewriter effect style font.
Where are the downloaded fonts saved on my computer?
Typically, when you download fonts, they are saved to your computer's default downloads folder. From there, you can unzip and move them to a fonts folder or any location of your choice.
How can I ensure that the fonts I've downloaded are safe and free from malware?
It's essential to download fonts from reputable sources, such as Google fonts or Content Creator Templates. Always ensure that your antivirus software is updated and active when downloading any files from the internet and double check to see your downloaded fonts are .ttf or .otf files before opening them.
What's the difference between installing and adding fonts to DaVinci Resolve?
When you install fonts on your computer, they become available for use across various applications, including DaVinci Resolve. Adding custom fonts to DaVinci Resolve refers to selecting and using those installed fonts within the software for your video projects.
I've installed a new font, but I can't find it in DaVinci Resolve. What should I do?
If a particular font doesn't appear in DaVinci Resolve right after installation, try restarting the software. DaVinci Resolve needs to be restarted to recognize and load newly installed fonts.
Can I add more than one custom font at a time to DaVinci Resolve?
Yes, you can install multiple fonts on your computer simultaneously. Once installed, all these fonts will be available in DaVinci Resolve after you restart the application.
Wrapping Up
Today we learnt how to import custom fonts into DaVinci Resolve in 4 simple steps.
Some key takeaways are to always check the copyright licensing of any downloaded fonts you choose to use, and be sure to only download your font from reputable sources!
Using a custom imported font in your next project is a great way to add originality and unique branding and it couldn't be easier!

Anthony Gallo
Anthony Gallo is the cofounder of ContentCreator.com and lead educator in the online course 14 Day Filmmaker, that has taught over 100,000 aspiring creators how to shoot & edit professional video content with PRO and SMARTPHONE cameras.
Having created content in a variety of industries including commercial advertising, weddings, music videos, and hundreds of youtube videos, Anthony has amassed over 50 million views online and is constantly looking for new and engaging ways to create content and help others master this amazing craft.