Learn DaVinci Resolve Fusion Effects in Just 5 Minutes
Last UpdatedOctober 6, 2023
by
Anthony Gallo
The powerful Fusion page in DaVinci Resolve unlocks a node-based workflow that makes it easy to stack effects with precision.
While it may seem intimidating at first, I guarantee if you stick to this guide you’ll have the hang of it in no time!
This beginner's guide will walk you through core Fusion concepts in just 5 minutes. You'll learn how to access tools, add nodes, adjust settings, preview results, and start enhancing your projects with pro-level techniques.
What Are Fusion Nodes?

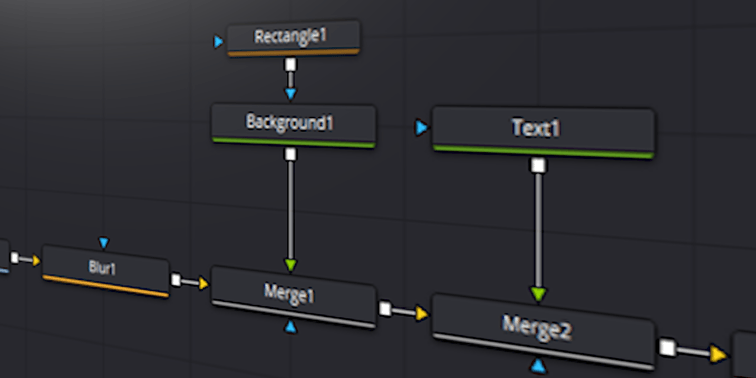
Fusion nodes are the building blocks used to add both basic and advanced effects to your video clips on the DaVinci Resolve Fusion page.
Each node represents a specific function, like color correction, merge, blur, or transitions. You insert nodes between the source media (MediaIn) and final output (MediaOut) to apply effects.
This node-based workflow provides more flexibility when compared to just stacking effects on the Edit page. And although it may seem counterintuitive at first, it’s actually quite simple.
The Fusion page can be used for everything from basic text and titles, to advanced effects like typewriter effects, chroma keying, and 3D modeling.
Learning to think in nodes unlocks the true power of Fusion and with some practice you'll be able to create advanced graphics and visual effects in no time.
Accessing Fusion Nodes
To access Fusion nodes, first make sure the timeline cursor is over the specific clip you want to work on in the Edit tab, then navigate to the Fusion page in DaVinci Resolve - this is where you'll build your node-based effects.
When you open the Fusion page, you'll see a Media In and Media Out node automatically added. These represent the start and end points for effects.
The Fusion panel consists of 3 main panels:
Video Displays
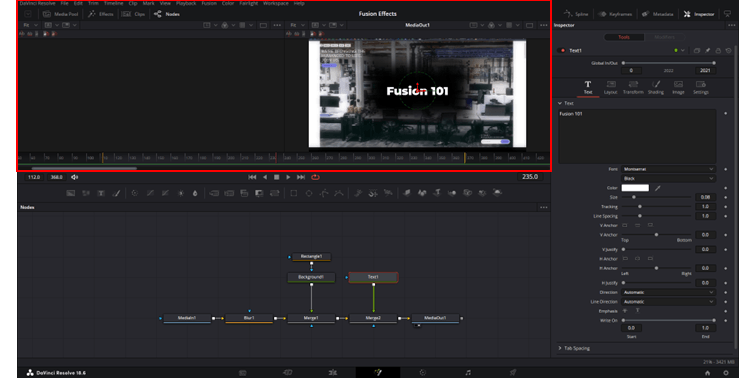
At the top of the page there are 2 video displays. The right hand display is often used to display the final video output as we’re all used to. The left hand display can be used to display a single node effect.
To control what is displayed try hovering your mouse over a node - you’ll see two little dots appear, these can be clicked and will display the node on the left and right display respectively.
Nodes Panel and Toolbar
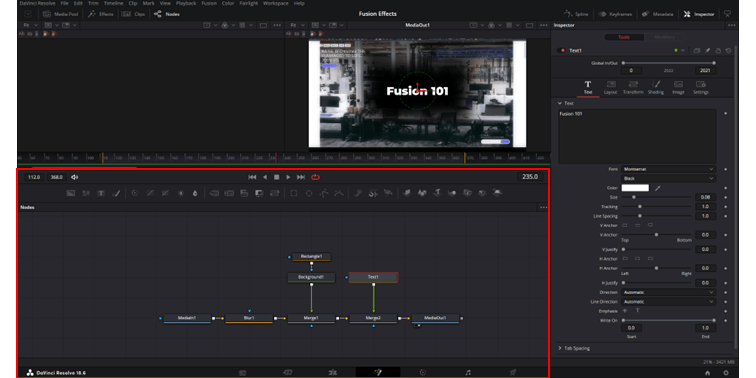
This is where you’ll add nodes and effects from the Toolbar. Try hovering your mouse over the Toolbar to see the various effects available in DaVinci Resolve.
The Toolbar should have close to everything you’ll need but for anything else click Effects in the top left to see the fill range of available Nodes in DaVinci.
You can drag any node onto the viewer to insert it into the flow between Media In and Out. The Node Editor window also provides another way to browse and add nodes.
Inspector Menu and Other Effects
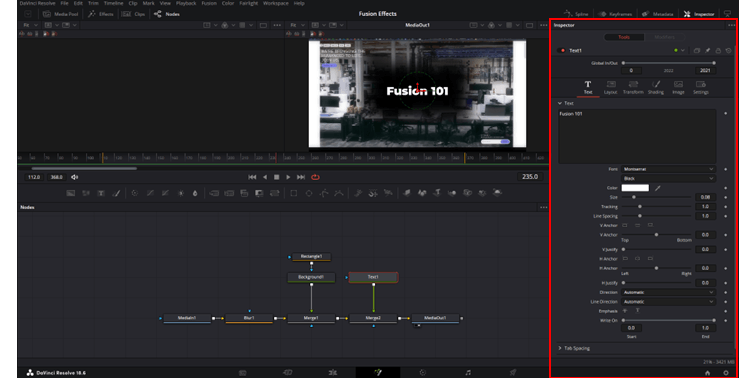
The Inspector menu is where you can make adjustments to any effects added on the node panel.
We can also opt to make Spline, Keyframe, and Metadata adjustments by clicking the relevant buttons here too.
Node Categories
The Fusion Effects Library contains a wide variety of node categories to meet basically any editing or effect need.
- The Color category includes essentials like Color Corrector and Brightness Contrast for dialing in the right tone and mood. Customized LUTs can also be applied through specialized nodes.
- The Blur section offers nodes for everything from subtle polish to dramatic effects.
- The Filter category provides specialized nodes for tasks like sharpening, noise reduction, and chromatic aberration.
- The Composite group gives advanced compositing tools like Merge and Mask.
- And 3D lets you work with 3D models, lights, cameras, and textures.
Beyond just effects and color correction, Fusion nodes are a great way to build fully customized effects including text, title, and unique transitions.
With experience, you'll know exactly where to look when you need a specific effect. You can also simply click the magnifying glass and search the name of your effect if you already know what you’re after.
Adding and Managing Nodes
Once you find the perfect node for your effect, it's time to add it to your composition.
There are two easy ways to insert a node:
- You can drag and drop from the Effects Library into the Node Editor. Release when you see the blue connector line appear.
- When a node is selected in the editor, you can click any node icon in the toolbar. This adds the new node in front of the selected one.
Rearranging nodes is as simple as dragging to place them in the optimal order. Order matters because effects are applied sequentially.
If you like a neat layout like me, try right-clicking the mesh > Arrange Tools > to Grid. This will enable your nodes to snap-to the grid and keep everything nice and neat.
With practice, constructing node trees becomes second nature so take your time in the beginning, there’s no rush while you’re learning!
Node Inspector
Once added to your node tree, it's time to dial in a node's settings.
Each node has its own inspector panel where you can tweak parameters. For example, in the Blur node you can adjust the blur Strength and Type.
Learn which settings matter most for nodes you use often. For example, in the Color Corrector, mastering RGB balance, saturation, and curves will take you far.
Keyframing options allow you to animate settings over time too and the functionality is similar to adding keyframes in the Edit page.
As you use nodes, pay attention to which parameters give you the desired effect so you can quickly zero in on what matters in that inspector panel. It all comes from practice.
Previewing Effects
One Fusion technique that will boost your productivity is previewing your composite with nodes disabled.
This allows you to isolate and evaluate each node's impact. The easiest way to disable a node is by highlighting all your nodes and toggling the red button in the Inspector panel. Disabled nodes will appear dimmed.
By inspecting the before and after views, you gain greater understanding of how each node contributes to the overall effect. Disabling nodes is an easy way to troubleshoot when your composite doesn't look as intended.
Advanced Fusion Techniques
While this guide covers some basic Fusion concepts, there are even more advanced techniques to explore.
The 3D category of nodes allows you to work with 3D models, lighting, cameras, and textures. This opens the door to 3D title sequences, product shots, and abstract geometries blended with your footage.
The Particle category provides powerful particle system effects. Mastering these advanced nodes will let you recreate Hollywood-level movie effects right inside Resolve. The compositing possibilities are endless.
FAQs
How do I reset nodes in the Fusion panel?
To reset a node in the Fusion panel, simply right-click on the node you want to reset, head to the inspector panel, and click the ‘Reset’ icon shown as a circular arrow.
This will revert the settings of the node to their default values. If you want to reset multiple nodes, select them by holding down the Ctrl/Command key while clicking, then rest from the Inspector panel as before.
What are merge nodes in DaVinci Resolve?
Merge nodes in DaVinci Resolve are used for combining two or more images or effects into a single output. They allow you to layer one over another, effectively stacking them.
By connecting different media to these inputs and adjusting settings in the Inspector, you can determine how these images interact with each other, such as defining their blending mode or adjusting their opacity.
How to disable a node in the Fusion panel?
Disabling a node is a useful way to evaluate the effects of other nodes in your composition.
To disable a node, simply click on it or click and drag to select multiple nodes, then click on the red toggle button located at in the Inspector panel.
A disabled node will appear dimmed out, indicating that it's not affecting the output.
Conclusion
Working with Fusion nodes in DaVinci Resolve can be intimidating at first, but with a little patience you’ll soon be able to add effects intuitively with this powerful tool in DaVinci Resolve.
The Fusion panel offers both ease and flexibility, empowering you to layer and adjust basic and advanced effects with precision.
The node-based approach streamlines your workflow and can facilitate anything from simple tasks to complex visual effects and is an essential part of becoming an advanced editor in DaVinci.

Anthony Gallo
Anthony Gallo is the cofounder of ContentCreator.com and lead educator in the online course 14 Day Filmmaker, that has taught over 100,000 aspiring creators how to shoot & edit professional video content with PRO and SMARTPHONE cameras.
Having created content in a variety of industries including commercial advertising, weddings, music videos, and hundreds of youtube videos, Anthony has amassed over 50 million views online and is constantly looking for new and engaging ways to create content and help others master this amazing craft.