DaVinci Resolve Export GIF Tutorial and Tips
Last UpdatedJanuary 15, 2024
by
Anthony Gallo
GIFs are a great way to turn a plain image into an interactive upload for your website or social media content.
In this guide, I'll show you how to use DaVinci Resolve to export GIFs efficiently and transform your video clips into engaging GIF files.
From selecting and trimming your video file to optimizing GIF file size, all aspects of exporting GIFs in DaVinci Resolve are covered!
Introduction to GIF Creation in DaVinci Resolve
DaVinci Resolve is a versatile video editing tool capable of transforming your images and video footage into engaging GIF files.
Creating GIFs in DaVinci Resolve involves a few straightforward steps beginning with choosing the right timeline resolution and importing your desired assets from the media pool.
Adjusting clip speed, optimizing file size, and navigating the render settings are important factors to consider ensuring you get a high quality GIF at a reasonable file size.
Once you've successfully created your GIF file, setting up a custom export will take your images to another level of engagement on your blog, website, or social media page.
Step-by-Step Guide to Making GIFs in DaVinci Resolve
To export a GIF in DaVinci Resolve create what you want to export as a GIF in the edit tab. Navigate to the 'Deliver' page, choose 'Custom' in the 'Render Settings', and select the 'GIF' format. Adjust the resolution and frame rate as needed, and finally, click 'Add to Render Queue' and then 'Start Render' to export your GIF.
1. Create Your GIF
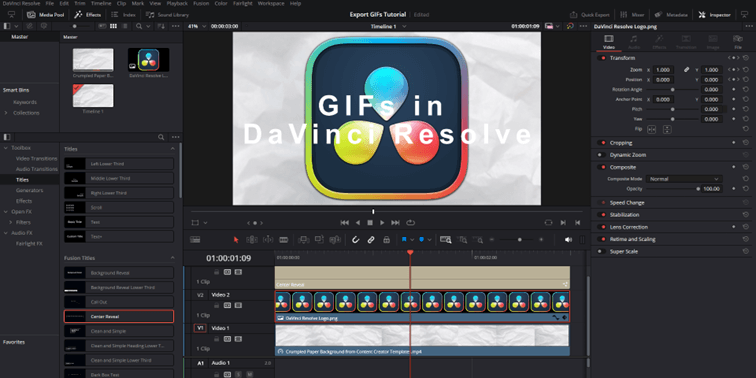
Import your media as needed in the media tab, then navigate to the Edit tab.
Create your GIF file using keyframes, custom titles, and any other media or effects you want. Remember to keep to GIF duration reasonable. 3 to 5 seconds gives a good balance between file size and GIF duration.
Double check the media and make sure you're happy, then, navigate to the Deliver page.
2. Optimize Your GIF Settings
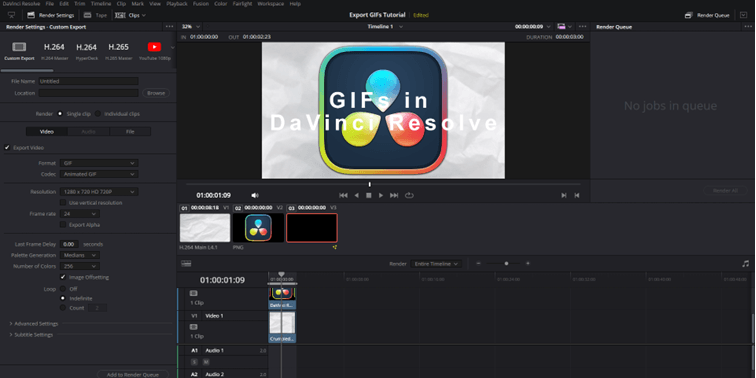
Once you have navigated to the Deliver page, you'll see a range of custom export settings as seen in the image above.
Here's a description of the relevant settings for exporting GIFs in DaVinci Resolve:
- File Name and Location: Enter the file name for you GIF and a save location.
- Format: Use the video format dropdown menu to select GIF for your video clip export.
Once you have selected GIF as the format, the menu options will change slightly:
- Codec: Determines the method of compression and decompression of video data; Animated GIF will be automatically selected.
- Resolution: Sets the dimensions of the video in pixels; 1920x1080 is a high-definition standard known as 1080p. To save on file size consider dropping this to 720p.
- Use vertical resolution: This setting switches to a vertical resolution, handy if you're exporting for Reels, Shorts, or TikTok.
- Frame rate: Controls the number of frames shown per second; 24 fps is a common rate and is suitable for most GIF files.
- Last Frame Delay: Sets the pause duration on the last frame before the animation loops again.
- Palette Generation: Chooses the method for creating the color palette the GIF will use. Medians is selected for averaging color values.
- Number of Colors: Determines the total number of colors available in the GIF. 256 is the maximum for GIFs.
- Image Offsetting: Checked to enable shifting of the image position in each frame creating a smoother animation.
- Loop: Options are 'Off' for playing the GIF once, 'Indefinite' for looping forever, or 'Count' for a set number of loops.
3. Export Your GIF file

Once you're happy with the export settings discussed above, it's time to export you GIF.
Click "Add to Render Queue" found in the bottom left side of the Deliver page and select your file destination if you haven't already done so.
Then, click "Render All" on the right hand side of the screen.
And we're done!
Tips for Optimizing GIF Quality and Size
If you're exporting GIFs to use on your website, it's worth keeping an eye on the file size to ensure your page load times are kept to a reasonable level.
If you're not concerned with file size, disregard this section!
The following tips are worth considering to retain GIF quality while keeping the file size to a minimum:
- Reduce the Number of Colors: Lowering the number from 256 to a smaller palette will decrease the file size, but it may also affect the quality and color of the GIF.
- Optimize the Palette Generation: Switching from 'Medians' to a different palette generation method might result in a more optimized palette that can reduce file size without significantly affecting the visual quality.
- Increase Last Frame Delay: If the content allows, increasing the delay on the last frame can sometimes make the GIF appear less choppy without the need for adding more frames.
- Remove Image Offsetting: If the offsetting isn't necessary for the visual effect, disabling it can reduce complexity and file size.
- Frame Optimization: Outside of these settings, removing unnecessary frames or using frame optimization tools that only update parts of the frame that change from one to the next can significantly reduce size.
- Crop the Image: If possible, cropping the image to the smallest size necessary to convey the action or message can reduce file size.
- Reduce Resolution: Smaller dimensions will lead to a smaller file size, but this will also affect the GIF's visual impact. 720p is usually good enough for most GIF files. If the file size is still too large select "Custom" under the Resolution menu and try dropping to 640 x 360.
It's worth noting that each of these changes can affect the quality and appearance of the GIF, so finding the right balance between file size and quality is key.
You can also consider using an online tool to optimize the file size of your GIF.
Learn how to add transitions in DaVinci Resolve here.
Wrapping Up
Exporting GIFs from DaVinci Resolve is an effective way to enhance your website's visual appeal. By importing your video clips into the timeline and utilizing DaVinci Resolve's user friendly editing tools, you can create your very own eye-catching GIFs.
Whether you're aiming to upload a quick clip or convert an entire video into a looping GIF, the process is straightforward.
Remember, the right format and optimization are key to ensuring your GIFs enhance your website's user experience without hindering its performance!
Check out the best free DaVinci Resolve Plug-ins!

Anthony Gallo
Anthony Gallo is the cofounder of ContentCreator.com and lead educator in the online course 14 Day Filmmaker, that has taught over 100,000 aspiring creators how to shoot & edit professional video content with PRO and SMARTPHONE cameras.
Having created content in a variety of industries including commercial advertising, weddings, music videos, and hundreds of youtube videos, Anthony has amassed over 50 million views online and is constantly looking for new and engaging ways to create content and help others master this amazing craft.