How to Add LUTs to CapCut: 4 Step Guide + FREE LUTs
Last UpdatedMarch 12, 2024
by
Anthony Gallo
Looking to elevate the aesthetic of your videos without spending a dime?
This guide will walk you through the process of applying Look-Up Tables (LUTs) to your videos using CapCut on your computer.
So for the easiest way to enhance your content's visual aesthetics with color grading quickly and effectively, follow the straightforward steps below! 👇
What Are LUTs?
LUTs, or Look Up Tables, are a powerful tool in video editing and color grading, playing an important role in manipulating the color balance and overall appearance of your video footage.
Essentially, LUTs are preset color formulas that apply complex color transformations to video footage, enabling editors to achieve a desired look or correct inconsistencies with just a few clicks.
They're incredibly useful in streamlining the color grading process, ensuring consistency across clips.
Whether using a professional or free video editor, LUTs provide users with a versatile and efficient way to enhance the visual aesthetics of their video projects.
Check out the best LUTs for CapCut here.
How to Add LUTs to CapCut?
Like most things in CapCut, Adding LUTs is super simple! Download the LUTs you want to use, import them, and simply drag them onto your timeline!
1. Discover and Download Free LUTs
Begin your journey by finding hundreds of free LUTs available online. Websites that offer LUTs typically allow you to preview the effect by showcasing a before and after example. This visual cue helps in deciding which LUT complements your video the best.
Once you've made your selection, proceed to download the LUT. These are often just a click away from being added to your collection. To broaden your options, use the search function on the site and select a style that closely matches your vision.
Take note where your computer downloads your LUTs to, you can move them to a new specific folder or just keep them in your default Downloads folder.
2. Import Your Video into CapCut
Once you've found the best LUTs for your specific emotions or cinematic look it's time to add some professional grade color grading with your new LUT.
Open CapCut and import your video footage, then drag and drop your video content from the media pool to the timeline as needed.
3. Import and Apply the Downloaded LUTs
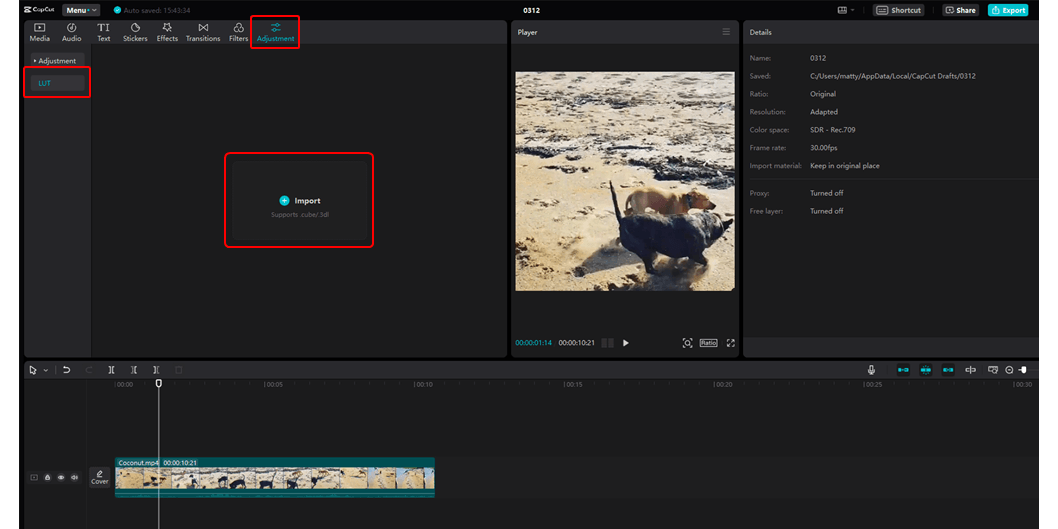
Make sure you've unzipped your downloaded LUTs first if they came in a .zip file format.
In the top left menu click "Adjustment", the "LUT". From here you can import .cube and .3dl files.
Click import and find your LUTs, you can import multiple files at a time.
Once imported, you can drag and drop your desired LUT onto the timeline, it will show as an adjustment layer.
4. Refine and Export

Once you've imported and applied your desired LUT it's time to fine tune if needed.
- Strength: Use the strength slider to adjust the strength of LUT on your footage.
- Skin Tone Protection: Utilize CapCut’s 'Skin Tone Protection' feature to retain natural-looking skin tones amidst the color grading process. This step is crucial for keeping a realistic and professional appearance in your videos.
- Adjust Settings: Tweak the strength of the LUT effect according to your preference. CapCut allows for further customization, enabling you to alter other color settings to match your desired outcome perfectly.
- Preview and Export: Once satisfied with your adjustments, preview the before and after effects to ensure your video meets your expectations. Proceed to export your newly color-graded masterpiece.
Following these steps will enable you to transform your videos with professional-looking color grading using free LUTs and CapCut.
Wrapping Up
Wrapping up, we've discovered that adding LUTs to videos via CapCut can significantly elevate the visual quality of your content.
This guide has taught us how to enhance multiple videos with professional color grading without spending any money!
By following the outlined steps, we've learned to apply free LUTs, ensuring our videos make a lasting impression with their aesthetic appeal. The process provides precise control over the final look of our videos, proving that sophisticated video editing is both accessible and straightforward.
Happy Editing! 😎

Anthony Gallo
Anthony Gallo is the cofounder of ContentCreator.com and lead educator in the online course 14 Day Filmmaker, that has taught over 100,000 aspiring creators how to shoot & edit professional video content with PRO and SMARTPHONE cameras.
Having created content in a variety of industries including commercial advertising, weddings, music videos, and hundreds of youtube videos, Anthony has amassed over 50 million views online and is constantly looking for new and engaging ways to create content and help others master this amazing craft.